A lot of users seem to get confused when it comes to the RAM. Similar to most other components in your computer, the RAM has many different characteristics that need to be understood before you can buy one. It also applies when you are upgrading your RAM, or pairing a new one in your current system. Hence, we are bringing you an all-inclusive guide for RAM. In this guide, we will talk in detail about what RAM is, how it works and what you need to know before you buy one for your computer. As we proceed, we will tell you how to check multiple parameters of the RAM so that you can pick the most compatible option for your computer. But before we go forward, let us try to understand the RAM module itself and how it operates in your computer.
Understanding RAM and Its Function
RAM is short for Random Access Memory. It is a fast memory module that your computer needs to operate. Whenever you launch a program, they are first loaded into the RAM of your computer before they can be displayed on your screen. Even when you boot your computer, the OS of your computer is first loaded into the RAM so that you can use it to browse your computer. Even though the RAM module is a storage device like the hard disk and SSD, it is quite different in terms of access speed and performance. While your storage devices have enormous capacity, they are significantly slower than RAM. Thus, your files cannot be accessed directly from your storage drive, even if you have the fastest NVMe M.2 storage drive. Your computer always loads the programs in the RAM first before you can interact with it. Therefore, the RAM plays an important role in the functioning of your computer. The overall operating speed and functionality of your computer are heavily dependent upon the capacity and speed of your RAM. If you have a large RAM capacity, your computer will be able to store more programs on it, allowing you to access more programs at once. This will enable you to have a fluent multitasking performance. Also, a higher clock speed of your RAM will allow the programs to load faster, which ultimately makes your computer faster.
How To Check RAM Capacity on A Windows Computer
Now that you understand what RAM is and how it works, let us dive into how you can check the characteristics of the RAM. As the RAM is one of the primary components in your computer, you will be able to check its properties pretty easily on a Windows computer. Here’s how you can check the RAM capacity on a Windows 10/11 Computer:
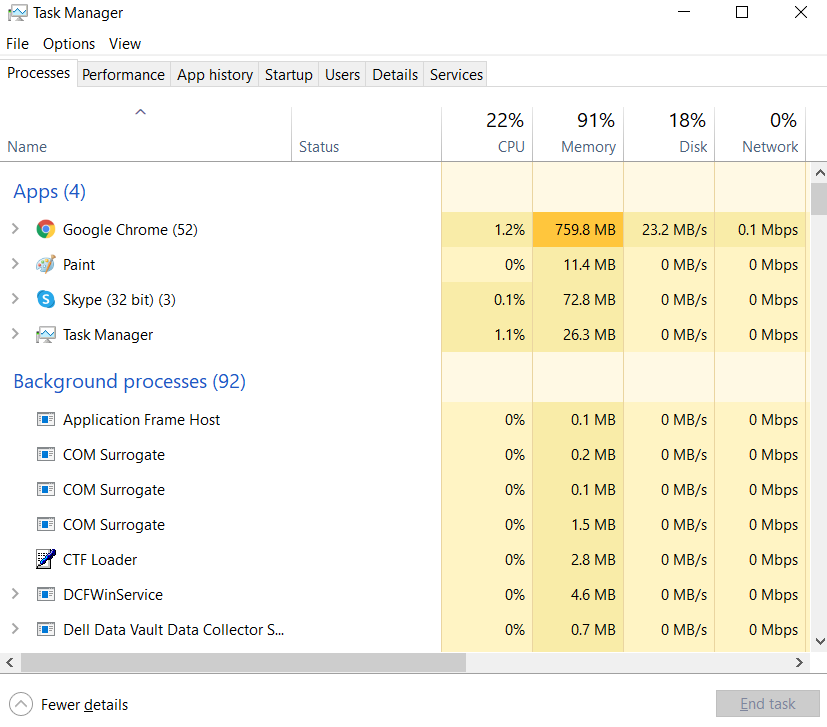
The task manager on Windows 10 and 11 is pretty helpful and offers a lot more information compared to previous versions of the OS. To open it, simply press the “Ctrl+Shift+Esc” keys in order.
Alternatively, you can also right-click on the Windows taskbar present at the bottom of your screen and select the “Task Manager” option from the list. If that does not work, you can also search for “Task Manager” in the Windows search bar and open the first result.
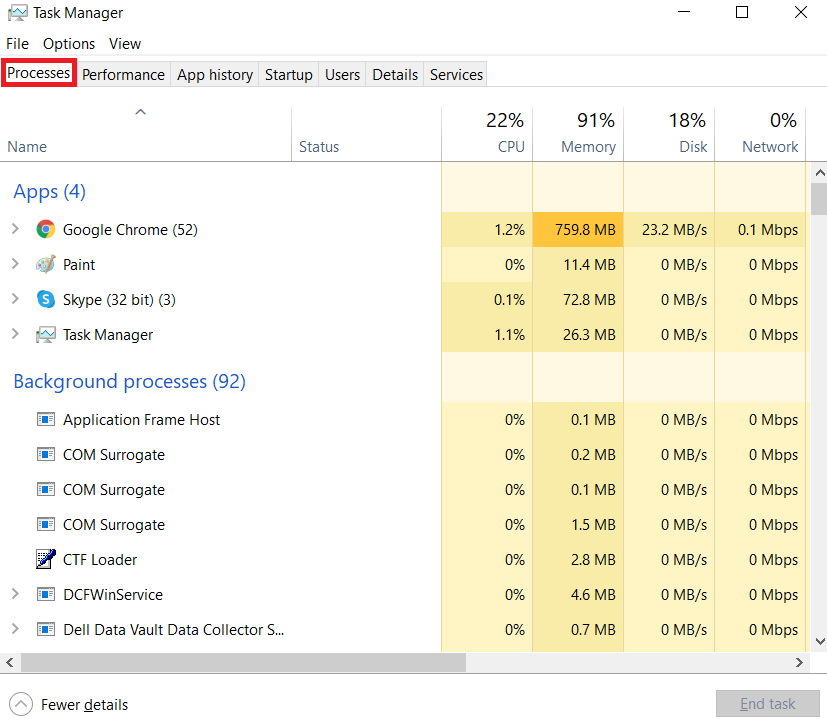
Now, you will be able to see a list of active programs. Click on the “More details” option present at the bottom of the window. Now, you will see a “Processes” tab where you can check all active processes.
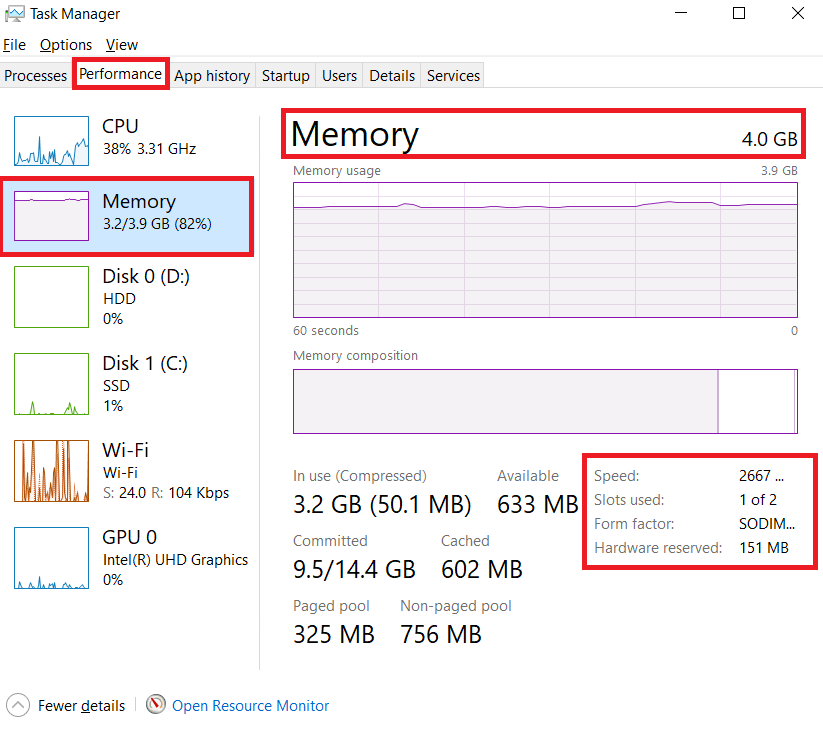
To check hardware parameters, head over to the “Performance” tab. Here, all major components of your computer are listed. Select the “Memory” option present in the left section. Now, you can check all parameters related to your RAM. On the top right, you will see the total capacity of your RAM.
Along with that, there is also a graph that shows how much RAM is being used at the moment. This will give you an idea about whether you need more RAM capacity or not.
Here’s how you can check the RAM capacity on a Windows 7 Computer:
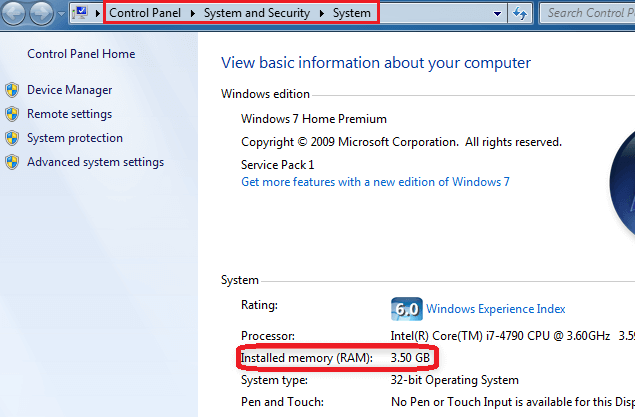
If you are using Windows 7 OS, you won’t find this information in the task manager. To check RAM capacity in Windows 7, head over to the Windows 7 start menu and search “Control Panel” in the search bar. Open the control panel from the search results. In the control panel, look for “Systems and Security” options. Once you are in there, access the “Systems” page. You can also right-click on “My computer” and select the “Properties” option to access this page. On this page, you will be able to get information about your OS as well as other computer hardware. In the “System” section, you can check the RAM capacity mentioned in front of “Installed memory (RAM)”. If you want to get more information about RAM, you can use renowned 3rd party software such as CPU-Z.
How To Check RAM Capacity on An Apple Computer
Checking the RAM capacity is also pretty easy on macOS. There are a few MacBook and MacBook Pro models that allow you to upgrade the RAM capacity. But before that, you need to check the capacity and features of your RAM so that you can find the most compatible RAM module for your macOS laptop. Here’s how you check the RAM capacity on an Apple computer:
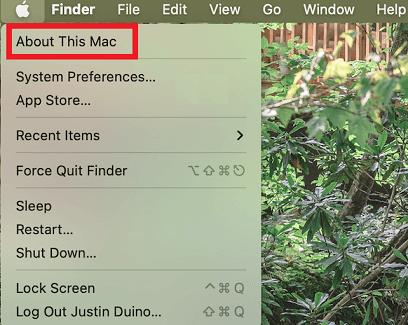
Click on the Apple icon on the top of your main screen.
This will open a menu that is pretty similar to that of a Windows start menu. Here, you need to select the “About This Mac” option.
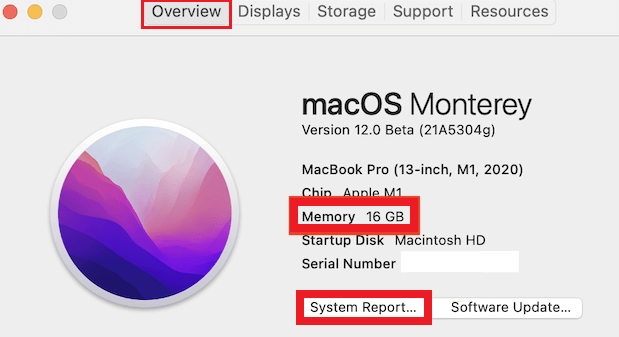
Once you select this option, it will open a new window where the specifications of your macOS computer are displayed. In this overview of specifications, you will find the RAM capacity mentioned right below the chip. If you want to know more details about your RAM, check the “Systems Report” button at the bottom of this overview.
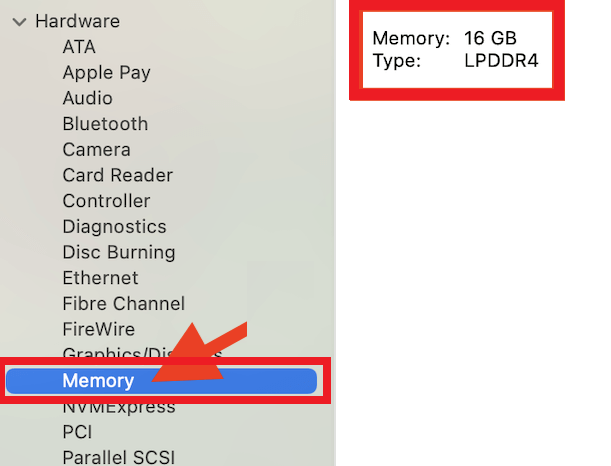
Now, simply choose the “Memory” option.
Once you do that, you will be able to see the capacity of the RAM, as well as the type of RAM, installed on your system.
How Fast is My Ram?
Knowing just the capacity of your RAM does not give an exact idea about its performance. In most cases, you will find a small capacity RAM performing better than a larger one with comparatively lower clock speed. The clock speed of a RAM is mentioned in the MHz unit which represents its operating speed per unit time. This definitely influences the performance of the RAM as the higher MHz rating ensures faster operating speed and loading times. You should always prefer buying fast RAM if you are buying a new one. New generation CPUs are also heavily dependent upon the RAM speed. Thus, if you want to get the best performance from your CPU, you must have similarly fast RAM. You can imagine how the processor will be bottlenecked if the RAM module is slow and cannot compensate for the CPU’s operating speed. Another reason to check the RAM speed is to verify its compatibility with another module. If you are running a dual-channel RAM setup, both must have an identical capacity as well as clock speed for optimal performance. If the RAM speeds are mismatched, you will notice frequent lags and stutters in your system. It occurs because one RAM is operating at a different frequency compared to the other one. RAM speed also matters a lot while playing demanding games that are heavy in terms of loadable assets and shaders.
Conducting A RAM Speed Test
If you are not sure how fast your RAM is, worry not. We will offer you detailed information on checking various RAM parameters which will be helpful for you. Apart from the RAM test, you can also run various other tests to check out other important factors such as CAS latency and overclocking features.
Checking RAM Clock Cycles
The clock speed of RAM basically tells you how many cycles are being carried out every second on your RAM module. The clock cycles are presented in MHz terms and are a big part of the RAM specifications. As the read and write actions on the RAM are performed in cycles, you can get a good idea about the performance of the RAM just from the clock cycles. To check the clock speed of RAM, follow these steps:
Enter the task manager on your Windows computer. Select the “More Details” button to access more options. Now, go to the “Performance” tab from the top of the window. Once you are here, you will see various components such as CPU, GPU, Disk, and Memory. As we wish to check RAM parameters, click on the “Memory” option. Here, all information is present about your RAM. It includes capacity, speed, currently occupied capacity, slots, and much more. The speed of your RAM should be mentioned in the lower right section. Here, you can check the MHz rating of your RAM.
Checking CAS Latency
CAS latency is a lesser-known parameter of the RAM. Still, it is equally as important as other options. CAS stands for column access strobe. It is basically a rating of the delay which occurs between your RAM receiving a command and taking action upon it. The CAS latency is usually represented in a format like 13-15-15-33. It represents the total number of clock cycles taken by the RAM to run the command. To check the CAS latency of your RAM, follow these steps:
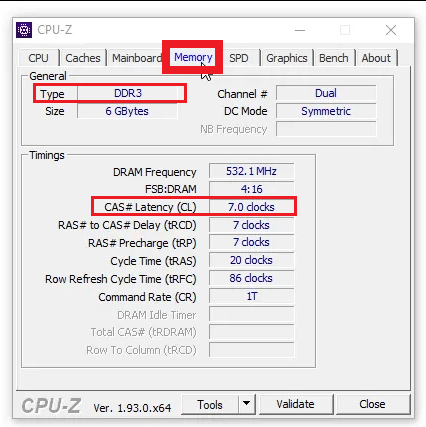
The easiest method to check the CAS latency of your RAM is via a 3rd party software. We will recommend using the CPU-Z tool as this is an all-inclusive option that offers information about other hardware components as well. To get CPU-Z, visit the website mentioned below. https://www.cpuid.com/downloads/cpu-z/ From here, you can download the CPU-Z installer for your computer. Download and install the software with the help of the installer. Once the installation is finished, launch the program.
Now, you will see a list of various hardware components installed on your computer along with their specifications. Navigate to the Memory tab to get info on your RAM. You will find all necessary information about your RAM mentioned here, along with the CAS latency.
If you have multiple RAM modules installed on your computer, head over to the SPD section and switch between the RAM modules.
Checking Overclocking Parameters
Overclocking is common for high-end gamers as it allows PC components to work at a faster rate to deliver ultimate performance. If you have a sufficient cooling system and components that support overclocking, you can try it out as well to feel the difference. However, a lot of users often don’t know whether the installed RAM is overclocked or not. It creates confusion and might also create problems in the system. Here’s how you can check the overclocking parameters of your RAM:
If you are using DDR4 RAM, then the default clock speed of your RAM is supposed to be 2400 MHz or below. If the RAM speed is higher than the default speed, it might be overclocked. In most cases, you should not worry about it as it does not affect the health of your RAM module or motherboard a lot. But, if you are facing problems, you should consider disabling them. To do that, head over to your motherboard BIOS settings. Here, switch to the Advanced mode and look for “XMP profile”. The BIOS settings UI might be different based on your motherboard manufacturer. Once you find the XMP profile, disable it. Press F10 to exit the BIOS and click YES to save the settings. Now, the RAM should be running at default clock speed.
Conclusion
RAM is one of the most essential components of your computer. Therefore, it is necessary to know each and every parameter of the RAM installed in your computer. This will let you understand the module and you can even get an idea about its expected performance. Also, this allows you to find the most compatible option for a replacement or RAM upgrade for your computer. If you are not sure about any factor mentioned in this guide, let us know in the comment section and we will offer you more info on the topic. Comment * Name * Email * Website
Δ
![]()
![]()
![]()

![]()

![]()
![]()

