We will see how to connect this sensor with Arduino UNO board, install the necessary software libraries and get the data from the sensor.
Introduction
Barometric Pressure (also known as Atmospheric Pressure), is the force exerted by air at a given point. The device used to measure the atmospheric pressure is known as Barometer (hence the name Barometric Pressure). Atmospheric Pressure is inversely proportional to the elevation or altitude i.e., as the elevation increases, the atmospheric pressure decreases. Hence, the air pressure on a mountain top is less than that at sea level. There is a significant importance in the measurement of Barometric Pressure as it varies from point to point on Earth and it helps in studying, analysing and predicting the weather and climate. We know that the SI units of Pressure is Pascal, which is force per unit area (1 Pa = 1 N/m2) but the Barometric Pressure is usually represented in hectoPascal (1 hPa = 100 Pa) or millibar (1 mbar = 100 Pa = 1 hPa). At sea level, the average atmospheric pressure is approximately 101,325 Pa (≈ 1,013 mbar or 1,013 hPa). This is known as Standard Atmosphere (atm = 101,325 Pa). Enough lecture on Physics. Let us move on with BMP180 Arduino Interface. First, let us see a little bit about the BMP180 Barometric Pressure Sensor.
A Brief Note on BMP180 Sensor
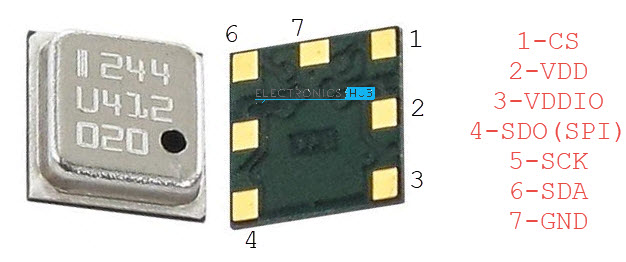
The BMP180 is a Digital Barometric Pressure Sensor from Bosch. It is an ultra-low power device based on piezo resistive MEMS device. It can measure the atmospheric pressure in the range of 300 hPa to 1100 hPa. In addition to pressure, the BMP180 Sensor can also measure Temperature in the range of 00C to 650C. By measuring the pressure, you can also deduct the altitude of the point (as they both are related). The actual BMP180 Sensor is a tiny device with dimensions 3.6mm x 3.8mm. It is available in 7 pin LGA package and communicates with a Microcontroller either through I2C or SPI (only one is possible in the final sensor). An important point about sensors is its calibration. A sensor needs to be properly calibrated to produce acceptable results. Fortunately, all the Bosch BMP180 Barometric Pressure Sensors are factory calibrated so that they are ready to use.
BMP180 Module
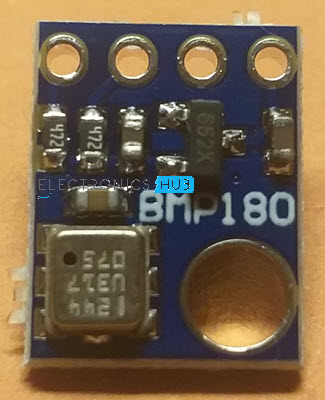
Many third-party module and sensor manufacturers took the tiny BMP180 Sensor and designed a small Module, which is perfectly suitable for Arduino and other DIY Projects. Most of the modules available today use I2C Communication.
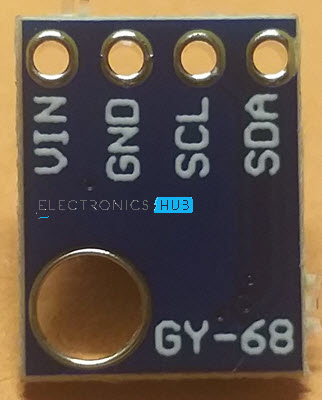
If you want to see the pinout of the BMP180 module, the its is printed on the back of the PCB. This version of the sensor communicates through I2C and hence the module consists of only 4 pins.
VIN GND SCL SDA
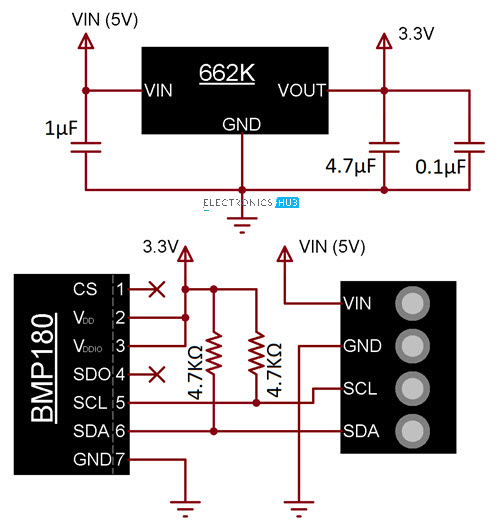
Schematic of Module
Since the BMP180 Sensor works on 3.3V, the module consists of an on-board 3.3V voltage regulator so that you can power the module directly from 5V boards like Arduino. If you want the full schematic of the module, then check out the next image. As you can see from the schematic, the SCL and SDA pins of the I2C communication are pulled HIGH using two 4.7 KΩ Resistors respectively. You don’t need to worry about the pull-up resistors anymore. IMPORTANT NOTE: There seem to be too many fake or faulty or wrongly calibrated Bosch BM180 Sensors out there (at least in my experience). I bought 3 different modules (from three different vendors) just for this project. So, buy from a reputed seller.
Connecting BMP180 with Arduino
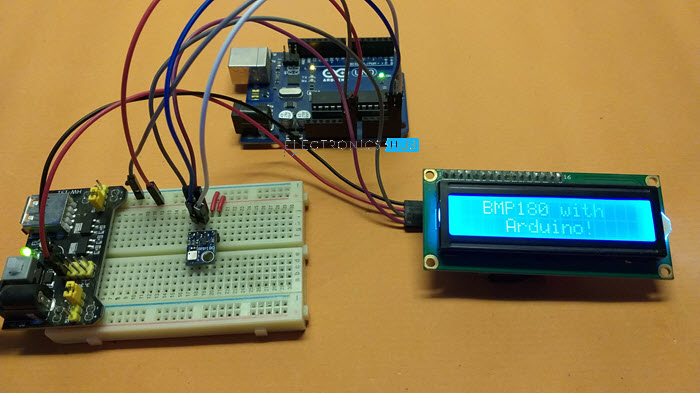
Now that we have seen a little bit about the BMP180 Sensor and its capabilities, let us proceed with BMP180 Arduino Connection. The BMP180 Sensor has to be one of the simplest sensors available for Arduino. For getting started with BMP180, all you need is an Arduino UNO, a BMP180 Sensor, bunch of connecting wires and a PC (or a laptop). That’s it. You can make few simple connections and get the data from the sensor on the Serial Monitor of Arduino IDE.
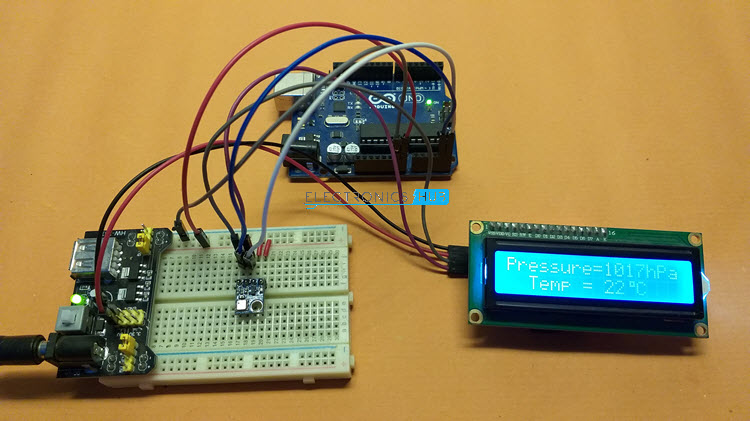
But to make things interesting, I went with an LCD Module, a 16×2 Character LCD to be specific, to display the results from the sensor. The reason for this is you can extend this simple project into a full-blown Weather Station Project as BMP180 can measure Pressure, Temperature and Altitude and with an LCD Display, implementing a weather station will be more intuitive.
Components Required
Arduino UNO BMP180 Pressure Sensor 16×2 LCD PCF8574 I2C LCD Module (optional) Breadboard Connecting Wires Breadboard Power Supply (optional)
Circuit Diagram
The following image shows the circuit diagram of Interfacing BMP180 with Arduino. I chose an I2C LCD as the sensor is also based on I2C communication. You can check out more about Interfacing I2C LCD with Arduino here.
Code
Before going to the code, you have to download the libraries for BMP180 Sensor. There are three options for this:
Adafruit BMP085 Library Adafruit BMP085 Unified Library Sparkfun’s BMP180 Breakout Arduino Library
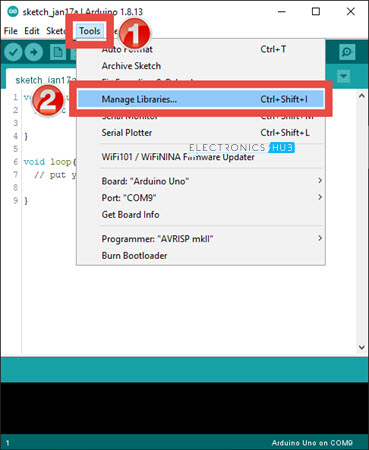
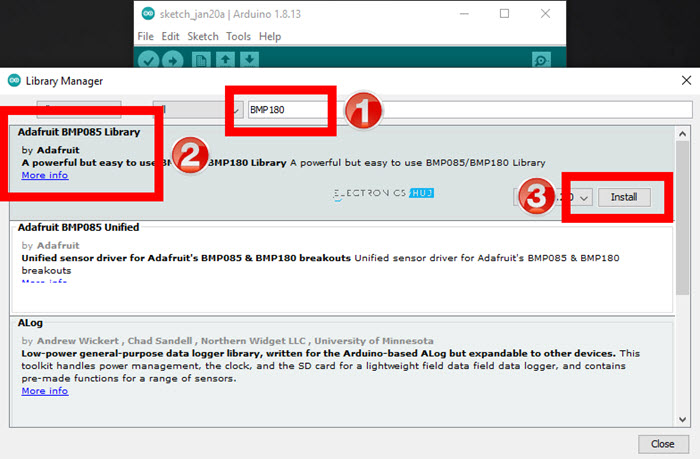
I chose the “Adafruit BMP085 Library” for its simplicity. You can always experiment with other libraries. Yes, the library says “BMP085”. It is because BMP180 is a replacement to the previous generation’s BMP085 Sensor. There is no difference in terms of software and you can use the same library for both the sensors. IMPORTANT NOTE: I believe even the BMP180 sensor is discontinued by Bosch and is replaced by BME280. So, my next project will be based on BME280 Sensor. To download the library, open Arduino IDE and go to Tools -> Manage Libraries …
In the search bar, type BMP180 and hit enter. Select the “Adafruit BMP085 Library” and click on install.
As far as code is concerned, I just used the library to read the Pressure and Temperature readings from the sensor and displayed it on the LCD.
Working
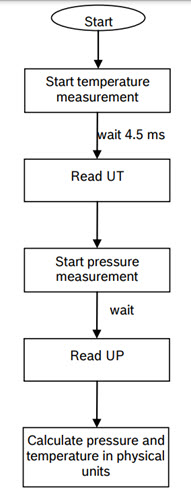
The datasheet of BMP180 clearly explains how to extract the Pressure and Temperature data from the sensor. All the information presented here is taken from the datasheet itself. Following image shows the sequence of steps to follow in order to read the data from the sensor. Here, UT is 16-bit Temperature Data and UP is 16-bit – 19-bit Pressure Data.
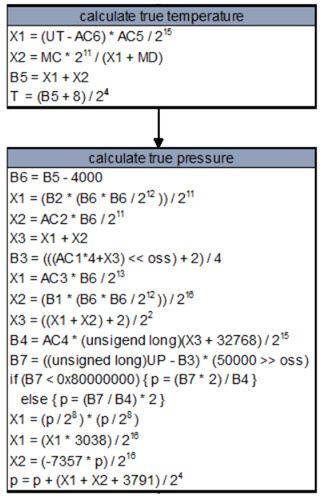
In this process, you have to perform a lot of complicated mathematical calculations. For example, take a look at the maths involved in calculating Temperature and Pressure from BMP180 Sensor.
This is just a part of the complete logic and the datasheet gives you complete information. Thank the Arduino Libraries, as they do all the necessary and complex calculations behind the scenes and provide you with simple APIs. Some useful APIs form Adafruit BMP085 Library are:
readTemperature(); readPressure(); readSealevelPressure(); readAltitude(); readRawTemperature(); readRawPressure();
For more information on the APIs, visit the github page of the library.
Conclusion
In this project, you learned how to interface BMP180 Sensor with Arduino and measure the Pressure and Temperature values. In a future project, I will show you how to interface the better and advanced BME280 Sensor with Arduino. Comment * Name * Email * Website
Δ
![]()
![]()
![]()

![]()
![]()

