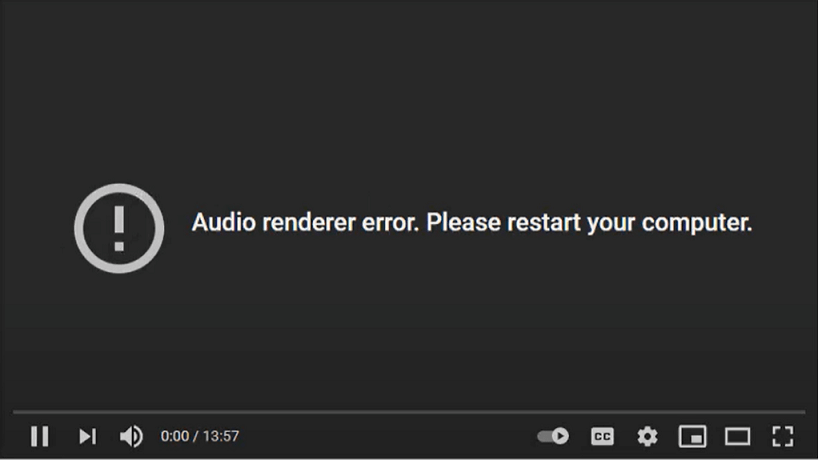
Yes, it could be frustrating at times when you are eagerly waiting for your favorite creator’s upcoming video, and then suddenly, this error makes you restart your PC for no reason. Well, if you are facing this error lately, you’re not the only one, we did experience it too. That said, we have come up with some of the fixes that helped us solve this issue on our PC, so it should be helpful for you as well.
Fixes for Audio Renderer Error:
In case you are constantly encountering the “Audio renderer error. Please restart your computer.” message while launching YouTube on your Windows PC, we have several easy methods for you all to try out. All these methods have effectively worked for many people and can be highly useful for you as well. We suggest you try these fixes one by one, and hopefully, the error will be resolved quite easily.
Reconnect your Headphones/Speakers
Before you dig into the computer’s settings and try to fix anything, you should stick to the easiest and the most basic methods first. Since it’s an issue related to audio, maybe the headphones or the speakers are not connected properly. In that case, simply unplug the audio devices from the computer and connect them back. Now, you can try to launch YouTube once again and check if the problem persists or not. If you are still getting the same error message, move on to the next method.
Restart your PC
As the error message itself suggests you restart the PC, you should not be neglecting that. In most cases, such an error occurs because of some minor bugs which can be removed or fixed by restarting the PC. Oftentimes, restarting the PC helps to fix this problem, but it’s not actually a permanent solution, and the error may occur after a while once again. Hence, knowing about other fixes is quite important in case you want to fix this error permanently.
Run Audio Troubleshooting
Since we are not aware of the actual reason why it’s happening on your PC, you can find the main reason by running the audio troubleshooter on your Windows PC. There’s no need to download or install any third-party software for troubleshooting as Windows already has its own troubleshooter built-in. To use that, you need to follow the steps mentioned below:
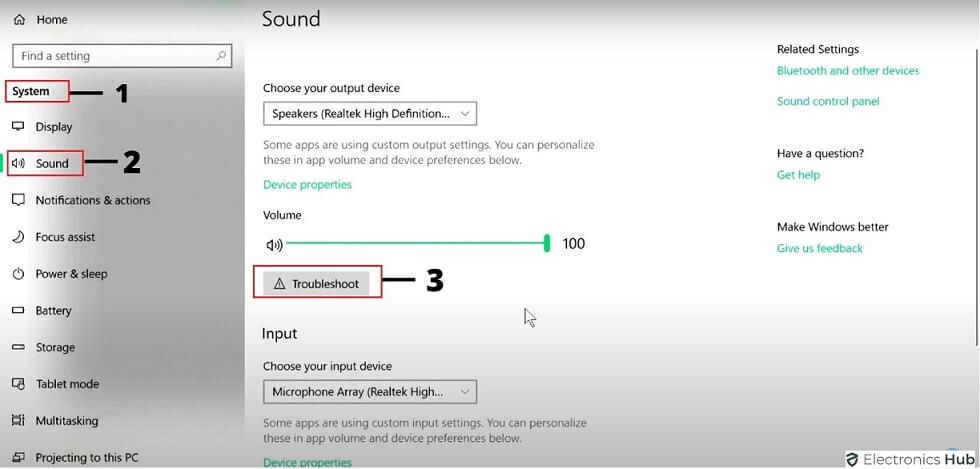
Go to Settings on your Windows PC by pressing the “Windows Key + I” shortcut on the keyboard. Click on System. On the left-hand side panel, click on Sound. Here, you will find the Troubleshoot button, for both audio output and input devices. Click on the Troubleshoot button present in the Sound Output section. Wait for a while until the troubleshooting process completes. If it shows you any faults, click on the Repair option, and Windows will handle the rest of the work. Lastly, restart your PC and check if the error has been resolved or not.
Restart the Audio Drivers
In some cases, the drivers on Windows PCs fail to work as they are supposed to which leads to errors like the Audio Renderer error. However, it’s not at all a big deal as you can easily restart the audio drivers by disabling them and re-enabling them. You can do this with any device driver present on your computer. But, since this error is related to audio, we will explain how you can restart the audio drivers on your Windows PC.
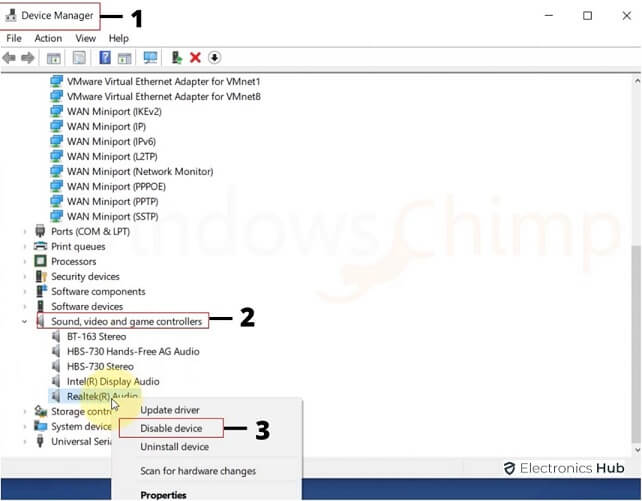
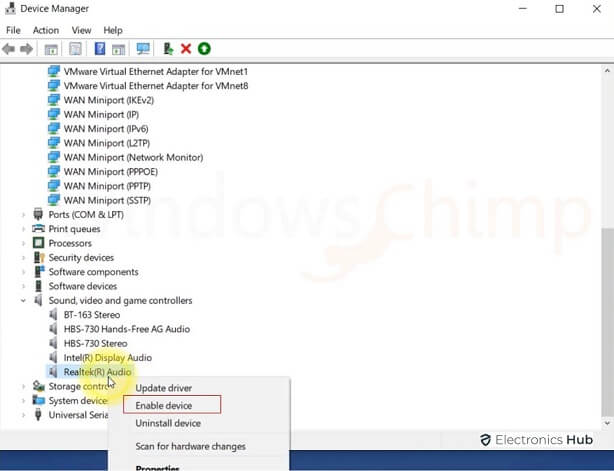
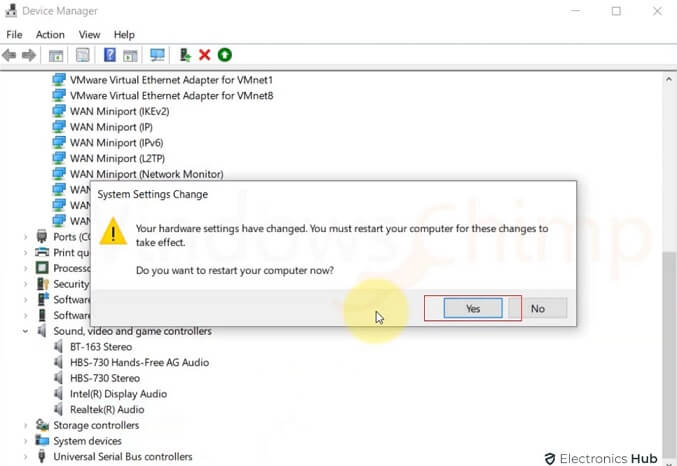
Right-click on the Start icon, it will pop up a quick settings menu on your computer’s screen. Click on the Device Manager option. Here, you will see a list of all the devices connected with your computer, and information about their respective drivers. Double-click on the Sound, video, and game controllers option, and expand the driver’s list. Right-click on the audio driver, and then, click on the Disable device option. If you see multiple drivers, disable them all one by one. Now, wait and again right-click on them and enable them back. Lastly, restart your PC, and it should fix the Audio Renderer error on your PC.
Update the Audio Drivers
If restarting the audio drivers is not helping you out, the drivers currently installed on your computer must have become outdated. That said, updating the audio drivers to the latest version is the best choice you have. Updating the audio drivers on Windows computers can be done either automatically or manually. In case you want to update the audio drivers manually, download the drivers from the official website only. Then simply look for the drivers which are ideal for your system, and download the setup. Run the setup and it should update the audio drivers on your PC. However, if you are not sure how it’s done, we suggest you let Windows handle it for you, and opt for the automatic installation. For that, go to Device Manager, as we mentioned in the previous method. Then expand the Sound, video, and game controllers option. After that, right-click on the driver that you wish to update. Click on the Update driver option, and choose the Search automatically for drivers option. Then, follow the on-screen instructions and restart your PC once the drivers are updated successfully.
Roll Back the Audio Drivers
In some cases, it is possible that the Audio Renderer Error may occur after you update the audio drivers. It may happen if the latest audio drivers are not properly installed or have some bugs. In such a case, you can roll back audio drivers and use the previous version, which used to work fine. To roll back audio drivers on your Windows PC, you need to follow these necessary steps:
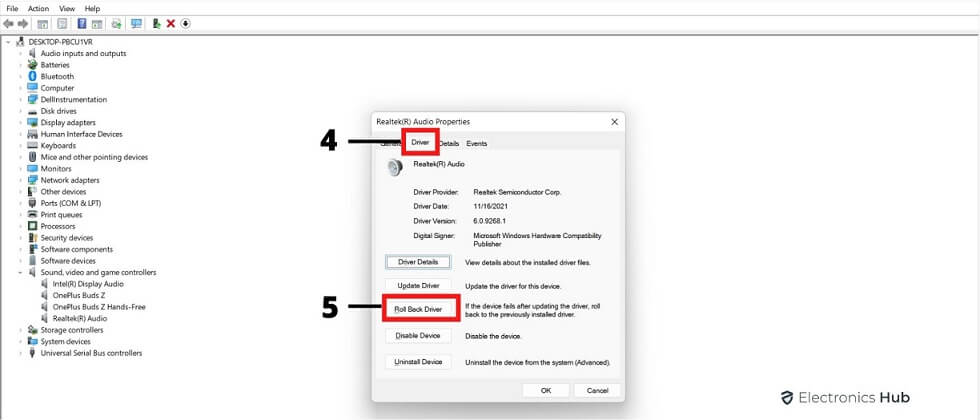
Press the “Windows + X” shortcut to access the quick settings menu. Click on the Device Manager option. Go to Sound, video and game controllers, and double-click on it to expand it. Now, right-click on the driver, and go to Properties. From the tabs given above, go to the Driver tab. Now, click on the Roll Back Driver button. This might take a few minutes, wait for a while and then restart your PC to confirm the changes.
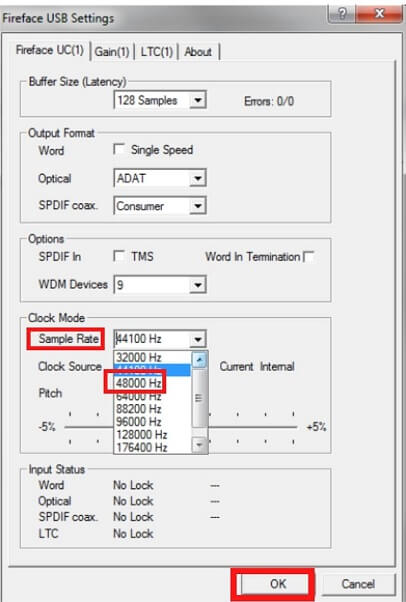
Set the same Sample Rate for both ASIO and Audio Drivers
Recently, if you tried out tweaking the audio settings on your PC using ASIO software, you may have set a different sample rate which is not matching with the Windows settings. In such cases, it’s common for the audio drivers to function abnormally and cause errors. However, it’s easy to fix this problem, and here’s how you can do it in the simplest way:
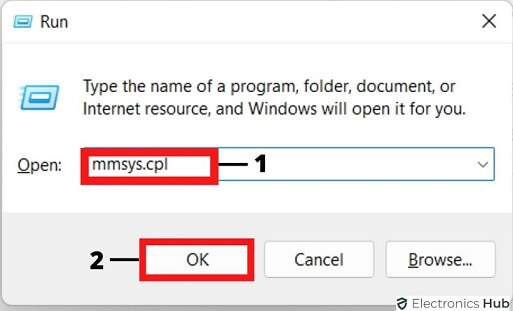
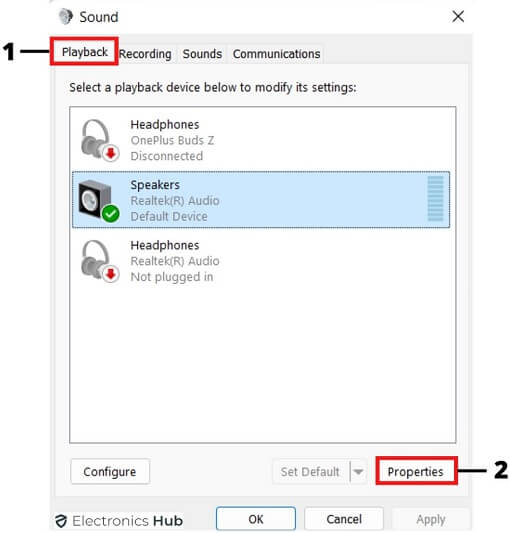
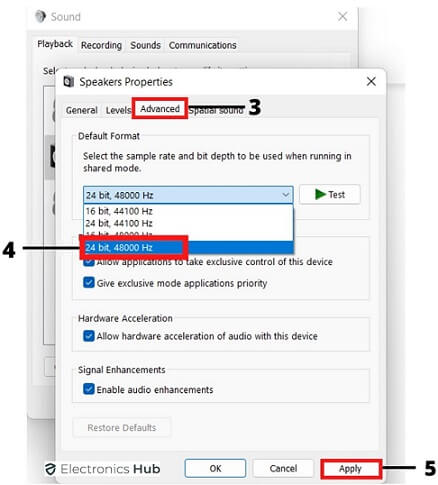
Open the Run Dialogue box on your desktop screen by using the “Windows + R” shortcut key. In the Open text field, type mmsys.cpl and click on Ok. The Sound settings window will appear on the screen, click on the Playback tab. Go to Properties, and select the Advanced tab. Here, you can choose and set any sample rate of your choice, then click Apply. Now, go to the ASIO software, and click on Audio. Set the same sample rate here as well, and close the software. Now, restart your PC, and the Audio Renderer error should be fixed by now.
Conclusion
Wrapping up, there can be multiple reasons why the Audio Renderer Error may ruin your day. However, with the help of these simple methods, you can easily tackle this error and fix it once and for all time. Once you have tried out all the methods that we have mentioned above, the error should not appear back again any time soon, or never. So, do try out these methods, and don’t forget to tell us which of these methods worked out for you. In case of any further queries, you can contact us or leave your queries in the comments section below. Comment * Name * Email * Website
Δ
![]()
![]()
![]()

![]()
![]()

