There could be times when you might have ordered to print something by mistake. Once you give the order, you cannot stop it. Even if you unplug your printer and put it back after some time, the spooler will continue with the previous order. In this article, we will illustrate various methods on how to stop printer spooling on Windows operating system.
Method 1: Stop Spooling With Command Prompt
Step 1 – Go To The Start Menu
Start by opening the Start menu of Windows OS. You can do so by pressing the Windows key on your keyboard. Otherwise, you can move your pointer to the bottom left corner of the desktop and click on the Start icon.
Step 2 – Search For Command Prompt
Once the start menu opens, type “cmd”. Cmd is the short form of Command Prompt. Once you finish typing, you must see the Command Prompt application listed on the screen.
Step 3 – Open Command Prompt Application
Right-click on the Command Prompt icon, and you will see a dropdown menu appear on the screen. Click on “Run as administrator” option from the menu. You may see a pop-up dialog box showing you a warning. Click on Yes to continue.
Note: Command Prompt is an application where you type commands for the operating system to execute instantly. Instead of using the command prompt, you can use the graphical interface of the operating system. But, at times, the command prompt saves a lot of time by letting you avoid various steps at once.
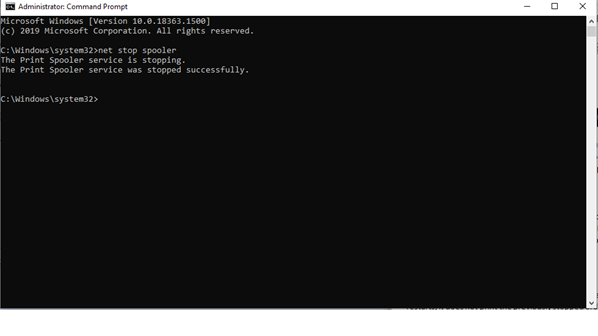
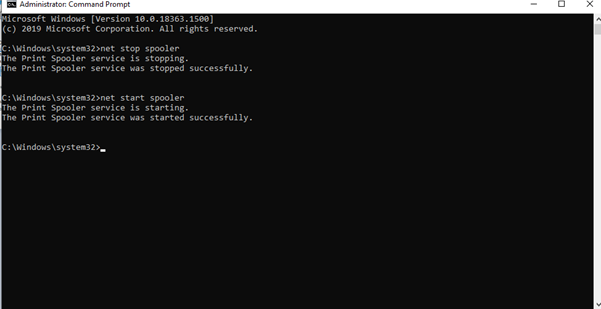
Step 4 – Stopping Printer Spooler Service
In the command prompt, type the command “net stop spooler” and press the Enter key. You will see a message on the command prompt “The print spooler service is stopping”. After some time, you will see another message confirming “The print spooler service stopped successfully”.
Step 5 – Delete The Pending Orders
Now that the spooler has stopped working, you have to ensure that when the spooler service restarts, it does not print the previously stopped order and pending orders.
Open File Explorer and in the address bar, type “C:\windows\system32\spool\PRINTERS” and press Enter key. You may be seeing a pop-up box asking for permission. Click on the Continue button. Now, you need to delete all the entries that you find inside the PRINTERS folder. Remember not to delete the PRINTERS folder.
Step 6 – Restart The Spooler Service
You need to restart the spooler service so that your printer continues to print documents for future orders without any issue. In the CMD type “net start spooler” and tap the Enter key. You will see the message “The print spooler service started successfully”. Finally, close the command prompt and restart your computer.
Method 2: Stop Spooling With Administrative Tools
Step 1 – Hit The Pause Button
When a printing process is on, you will see a dialog box that shows the process, and it comes with a Pause button. Press the Pause button, and the printer will stop printing temporarily. This will give you enough time to cancel the printing order in the queue.
Step 2 – Go To The Control Panel
Go to the Start menu by pressing the Windows key. Once the start menu appears and then type “Control Panel” and press the Enter key.
Step 3 – Go To Administrative Tools
Once Control Panel opens, find the “Administrative Tools” option from the list. Administrative Tools find you access to change system settings. Double-click on Administrative Tools. Note: Changing too many options through Administrative Tools can damage the system. Therefore, be careful and stick only to the steps we have mentioned.
Step 4 – Go To Services
Once you double-click on Administrative Tools, it will open a new window. Double-click on the “Services” option from the list. This will show you all the currently running services on your computer.
Step 5 – Stop Print Spooler
Once you double-click on Services and see the running services, search for “Print Spooler” on the list. Once you find it, right-click on it. Click on the “Stop” option from the dropdown menu. This will stop the spooler service and all the printing orders in the spooling queue. Keep this Services window open as we will need it in Step 7.
Step 6 – Delete The Pending Orders
You have to open File Explorer, and in the address bar, type C:\windows\system32\spool\PRINTERS” and tap Enter key. You may be seeing a pop box asking for permission. Click on the Continue button. You need to delete all the entries that you find inside the PRINTERS folder. But don’t delete the PRINTERS folder by mistake.
Step 7 – Restart The Spooling Service
Go to the Services window that is still open from Step 5. Right-click on the Print Spooler option, and from the dropdown menu, click on “Start” option. This is to ensure that the printer can start printing the new orders.
Method 3: Stop Spooling With Task Manager
Step 1 – Open the Task Manager
Tap Ctrl+ Alt+ Del on your keyboard together. This will open a screen from where you have to select Task Manager.
Step 2 – Go To Services
Once Task Manager window opens, go to the “Services” tab. You will see all the currently running services listed. If you are using Windows 10, you have to click on “More Details” on the Task Manager located at the bottom left corner.
Step 3 – Stop Spooler Service
From the list, search for the “Spooler” service. Right-click on it, and from the dropdown menu, click on the “Stop” option. Keep this window open as we will need it in Step 5.
Step 4 – Delete The Pending Orders
For this, you have to open File Explorer, and in the address bar, type C:\windows\system32\spool\PRINTERS” and press Enter key. You may be seeing a pop-up box asking for permission. Click on the Continue button. You have to delete all the entries that you find inside the PRINTERS folder. Remember not to delete the PRINTERS folder.
Step 5 – Restart The Spooler Service
Go to the Task Manager window that is already open from Step 3. Right-click on Spooler service, and from the dropdown menu, click on the “Start” option.
Conclusion
Hope the article has helped you in solving the spooling problem with your printer. The printer manufacturers are yet to come up with a one-click solution for the problem. Hence, for the time being, you have to choose from one of the three methods we have specified and get the job done. Comment * Name * Email * Website
Δ
![]()
![]()
![]()


![]()
![]()

