In this guide, I will show you some of the best methods to fix this issue so that your photos and videos are continuously backed up in the background to the Google account without any need for giving special attention to the app on Android.
1. Check Backup Settings
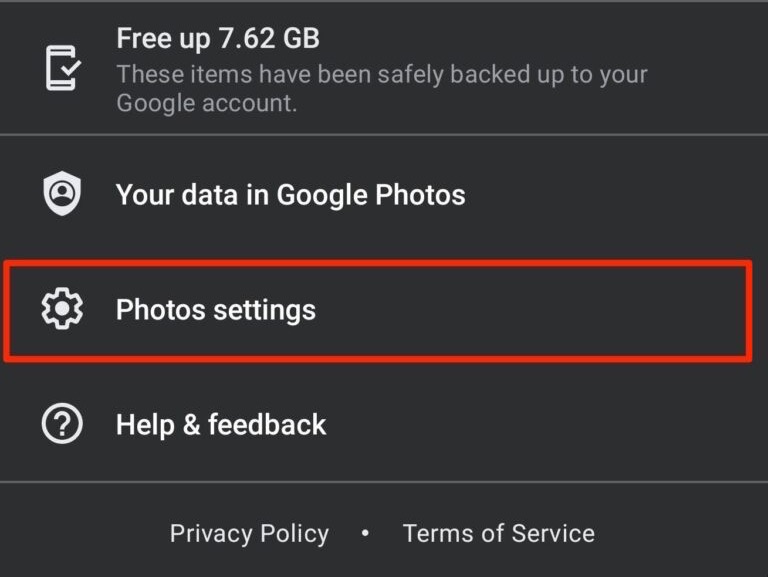
Google Photos offer a few settings for its Android app to make the backing up process more accessible. If you miss any of the settings or make unknown changes to the settings, the backup process may be interrupted. First, make sure the backup and sync option is enabled on your Google Photos settings. Step 1. Open the Google Photos app and tap on your profile image.
Step 2. Now, tap on the Photos settings option.
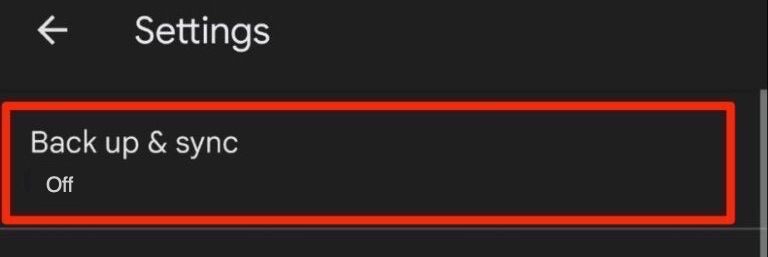
Step 3. The first option you will see would be Back up & sync; click it.
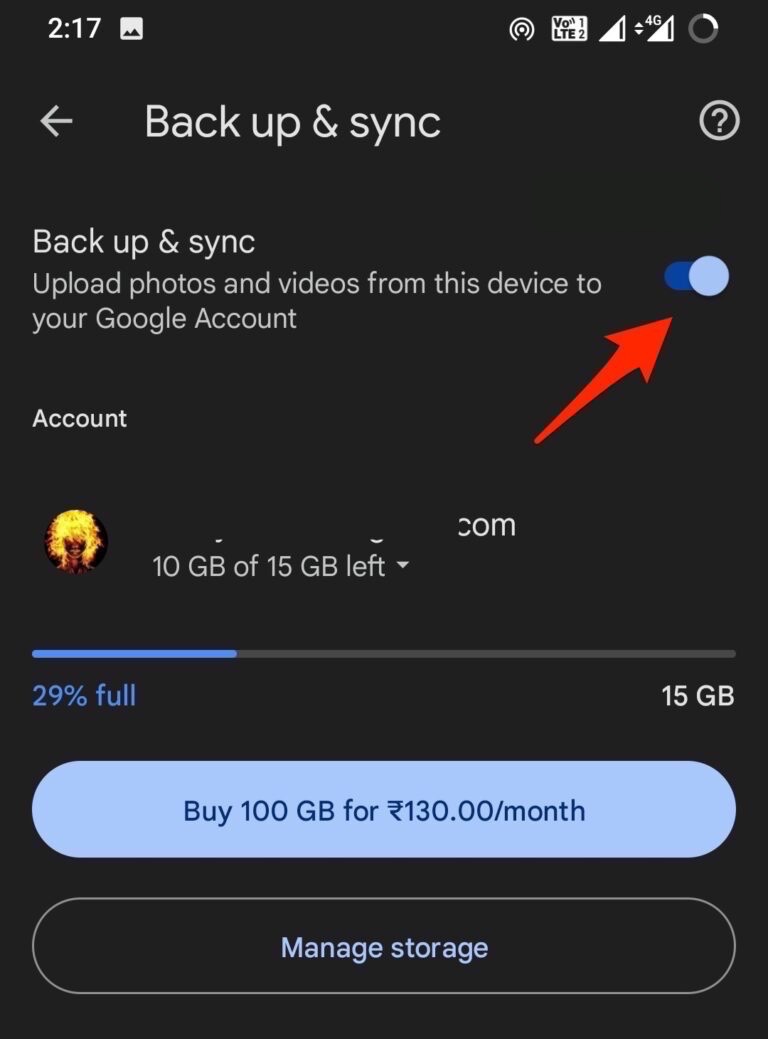
Step 4. Enable the toggle to turn ON the backup process.
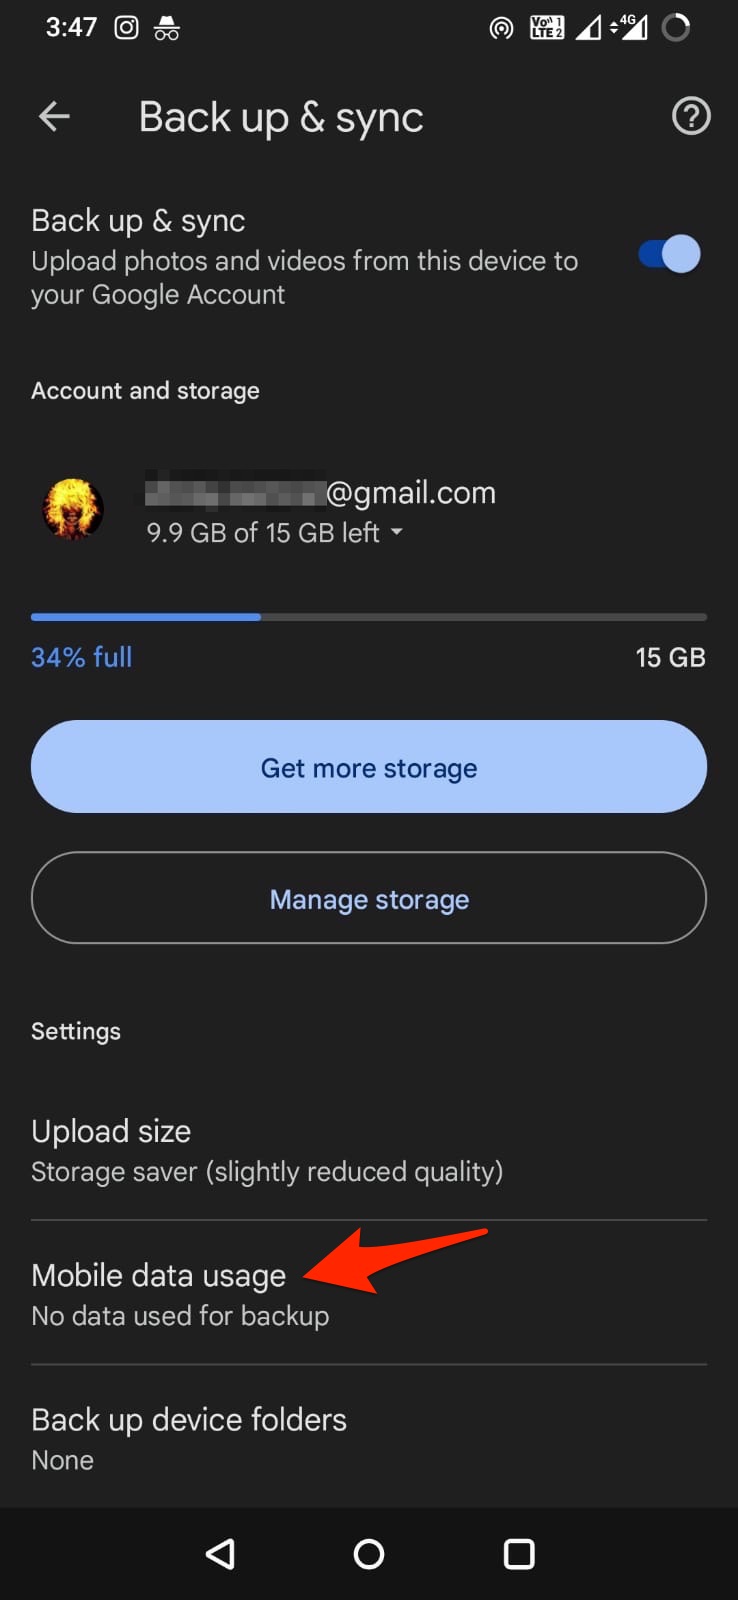
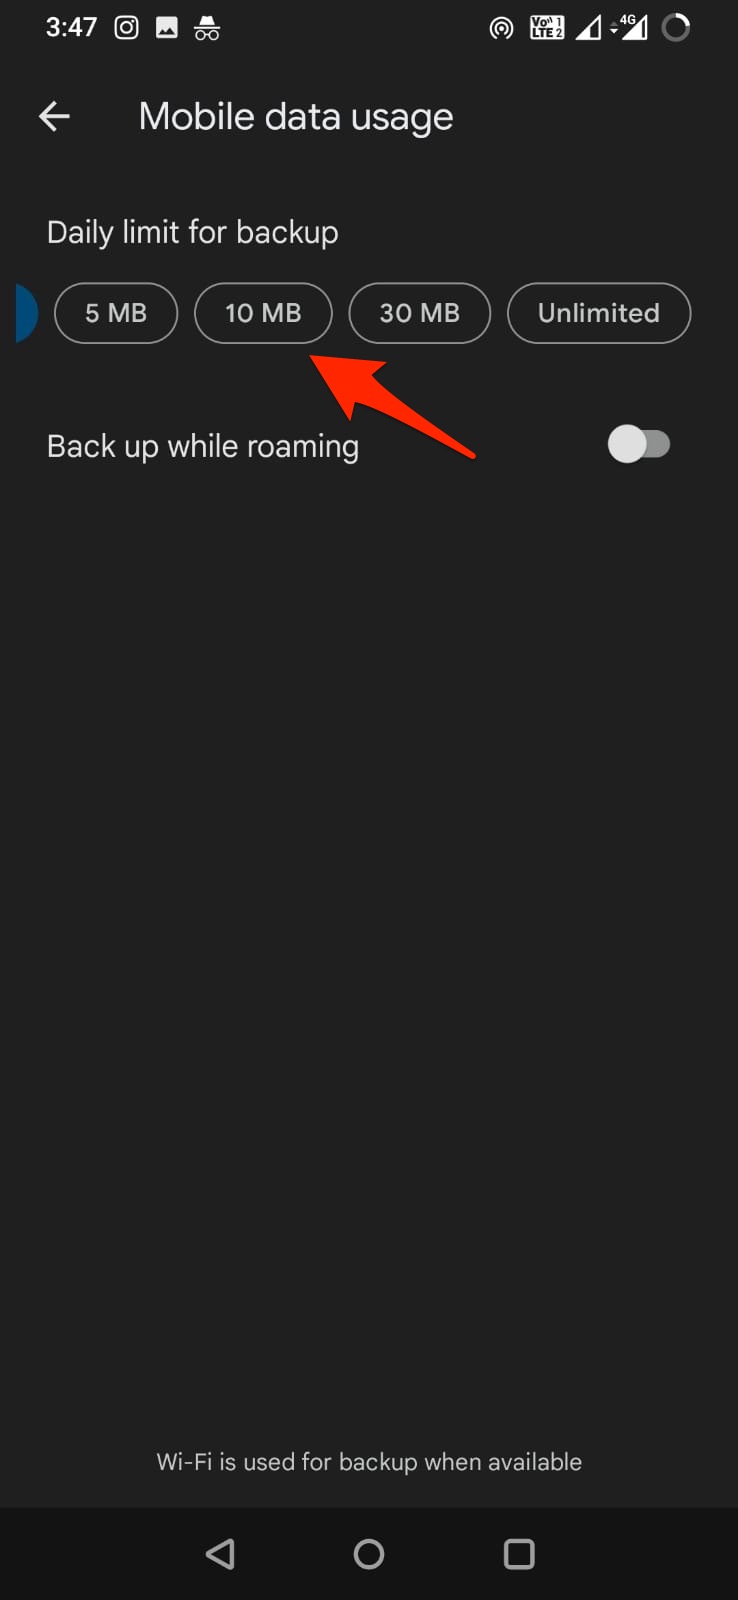
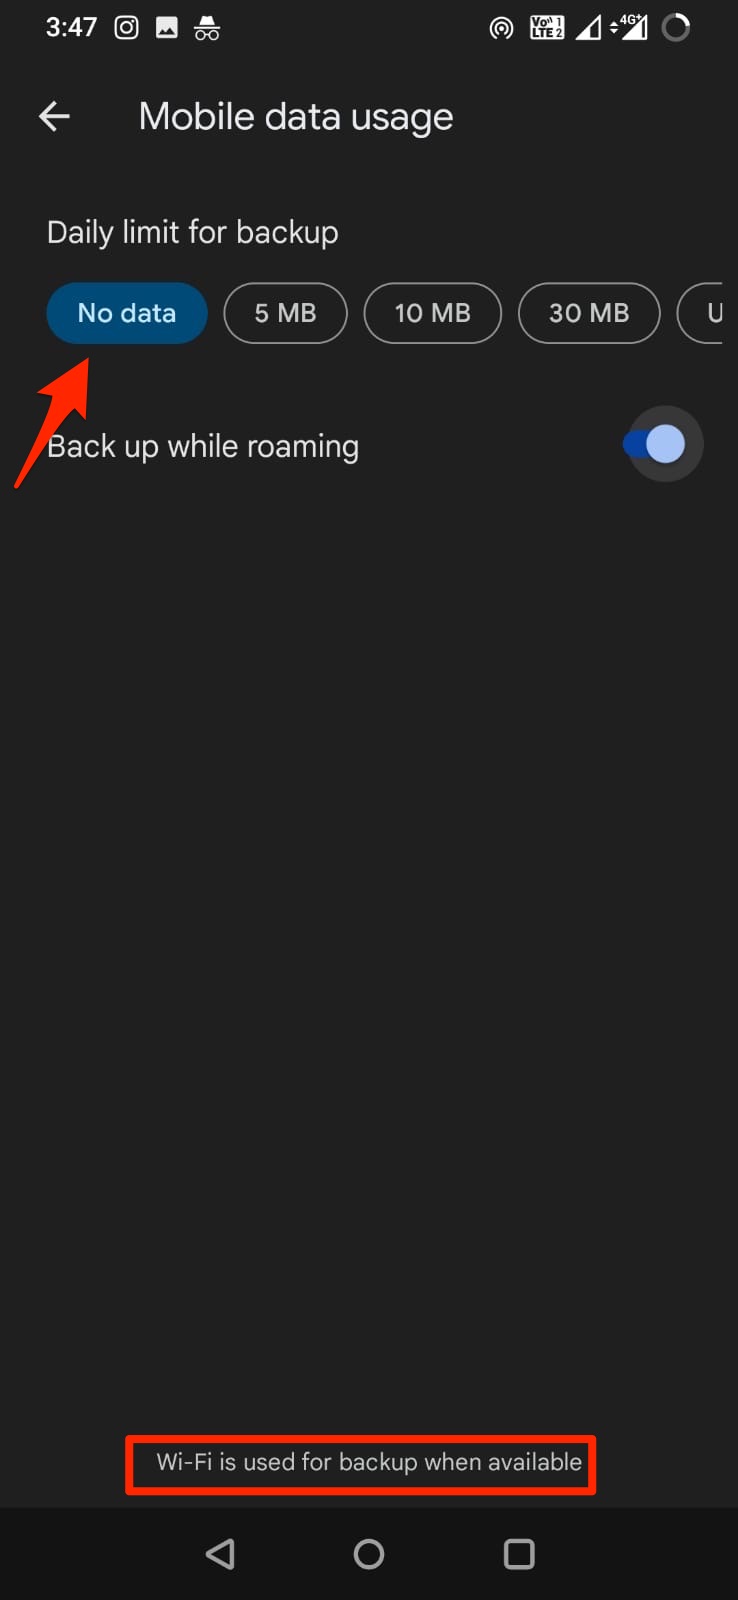
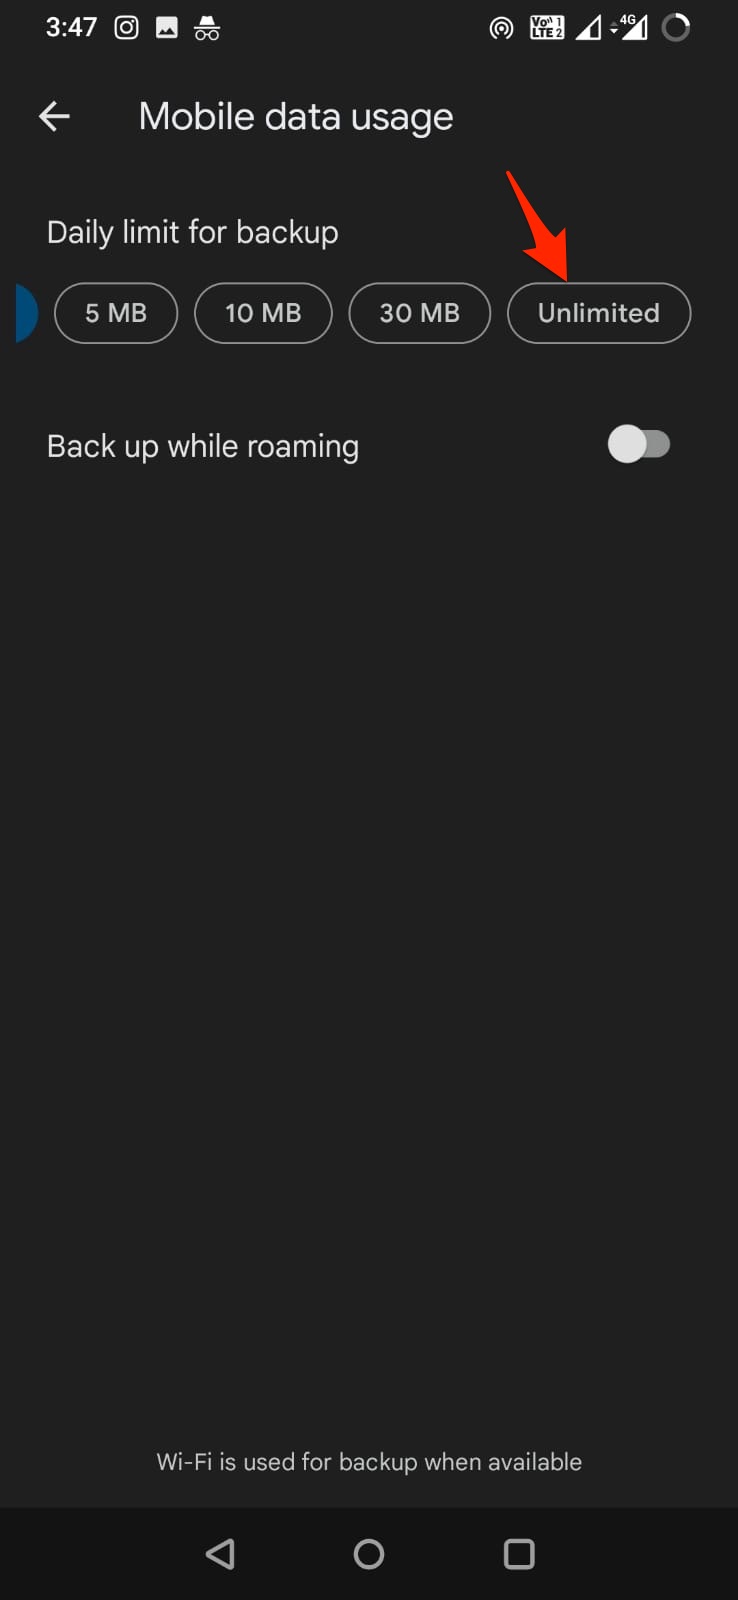
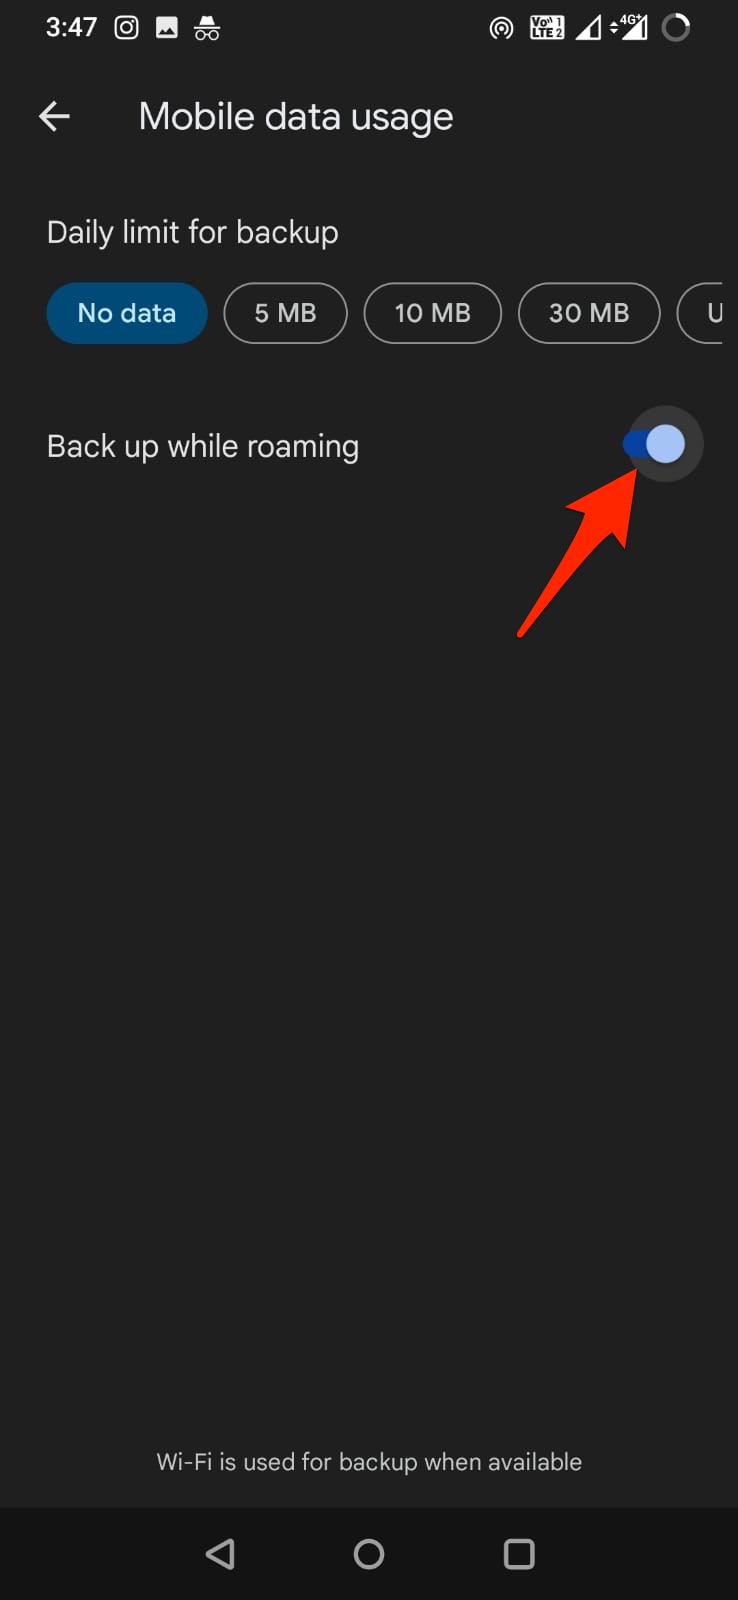
Google automatically uploads photos and videos over mobile data or Wi-Fi. But there are a few settings that you need to take care of for the media to upload if you see backup is not taking place. The Google Photos app offers an option to limit data usage; you can set the daily limit for photo uploading to Google Photos Cloud. And if the limit is reached for the day, then the backup process will pause till the next upload cycle/day. Click on the Mobile data usage option; if you are using mobile data and the limit is set to 10MB, only 10MB of media will be uploaded to Google for the day, and then the backup process will stop. But if you are connected to WiFi, there is no upload restriction. If you set the option to No data, your cellular data is not used to upload the file unless you are connected to WiFi. And if the option is set to Unlimited, all photos and videos will be uploaded to Google over your mobile data without any restrictions. If you are roaming, then you need to turn on the toggle to allow roaming to backup media to Google Cloud. In any case above, if you connect to a WiFi network, then all the photos and videos will upload to the cloud without any limitations.
2. Disable Data Saver and Battery Optimization
Android phones come with features like Data Saver and Battery saver. These are good features as they help maximize the phone performance, but they come at the expense of limiting the app functions. If you enable a data saver, then apps running in the background may not be able to receive or send the data, thus preventing the Google photos from uploading in the background. Similarly, when it comes to battery optimization, some of the app functions are restricted, and the app will not work the way it is intended. Therefore, it is good to disable the battery saver and data saver options for Google Drive.
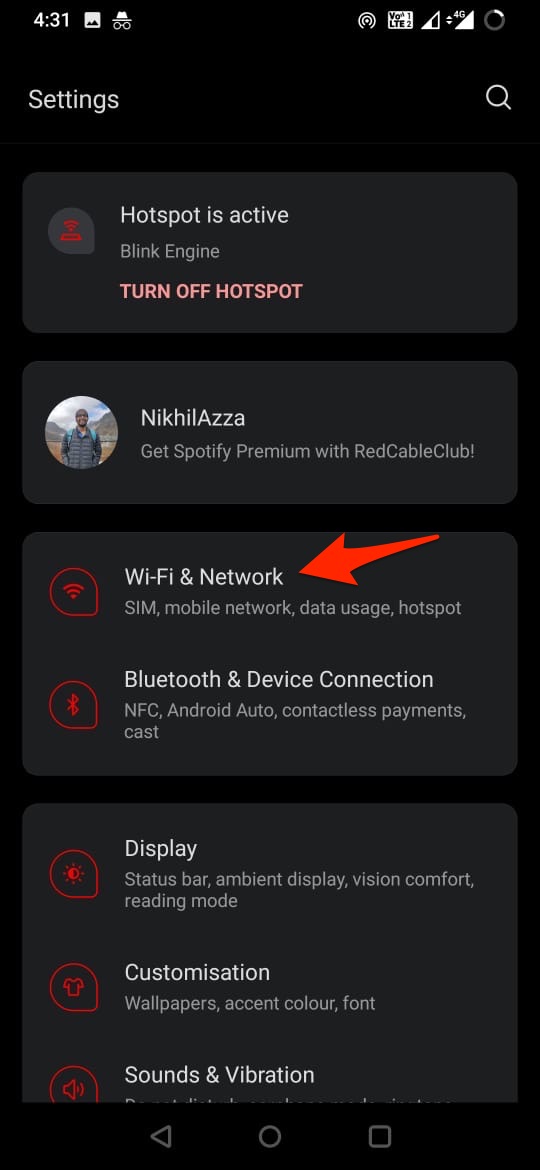
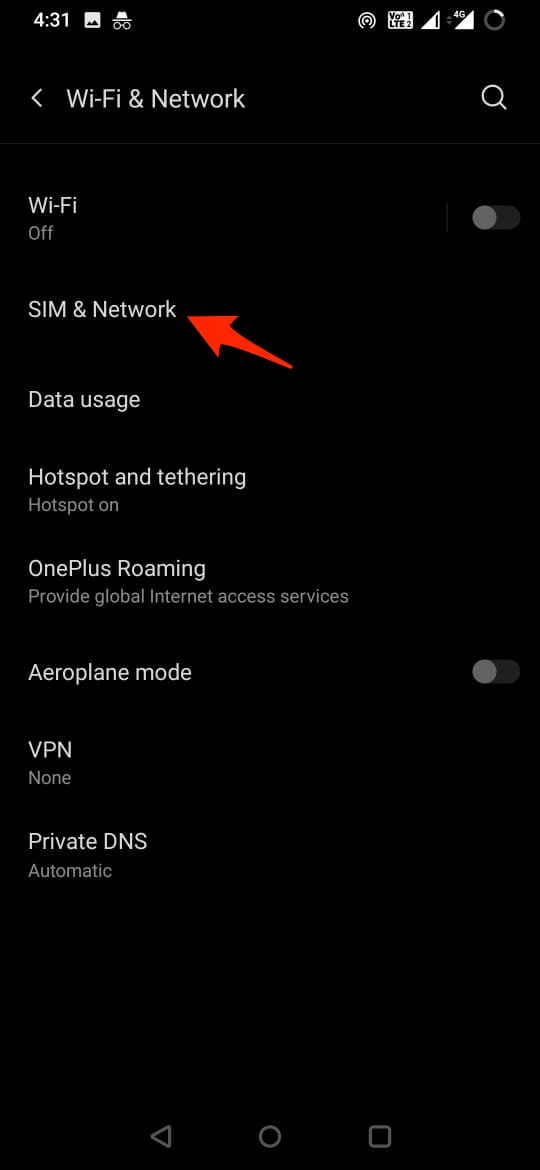
How to Disable Data Saver, options may vary from device to device.
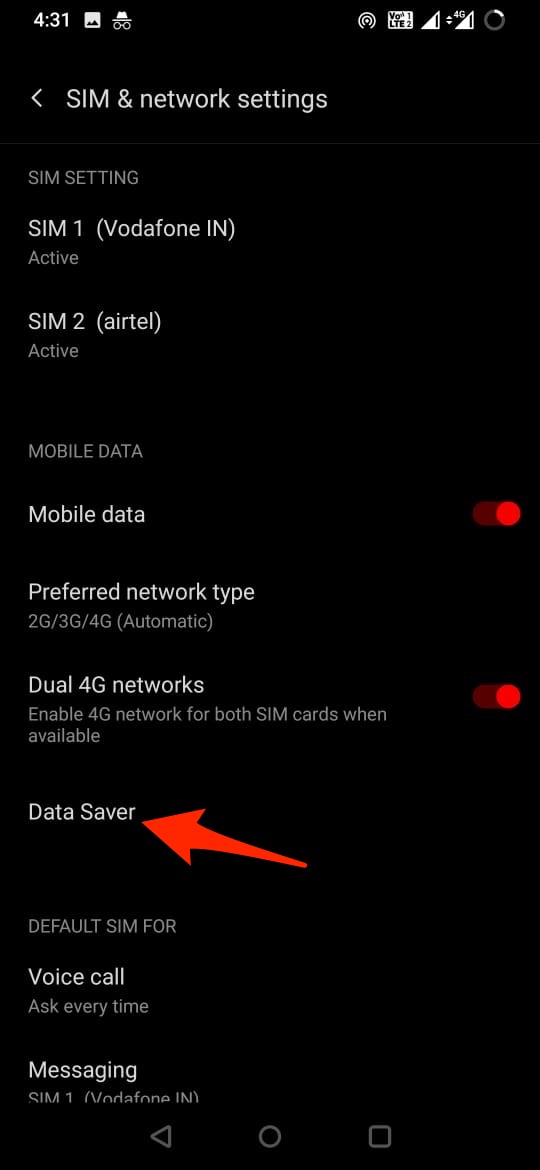
Open Android Settings, and click on WiFi & network.Now tap on SIM & Network.
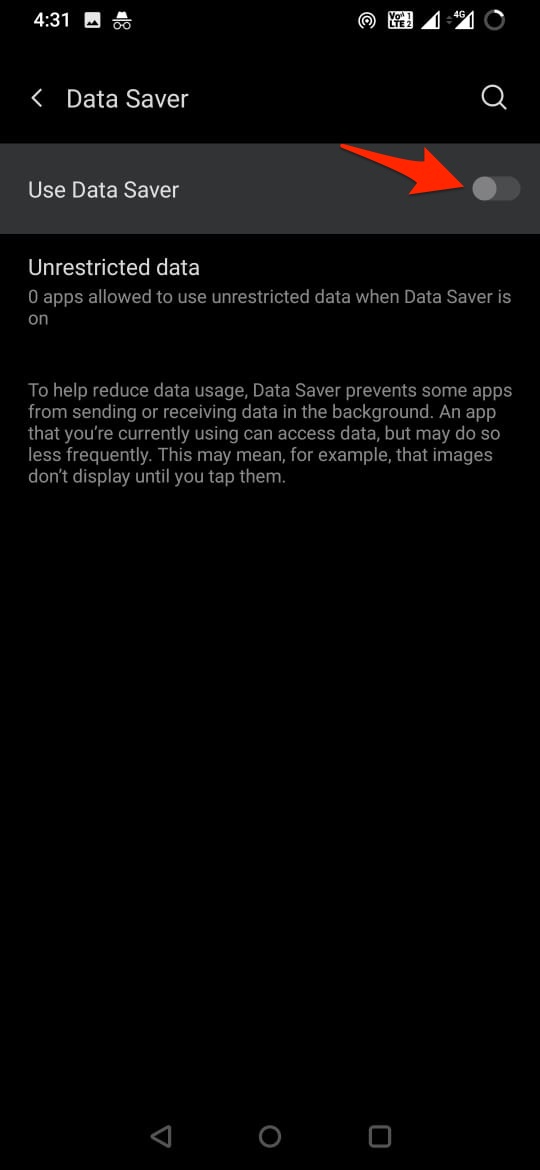
Select Data Saver and Turn Off the toggle.
How to Disable Battery Saver?
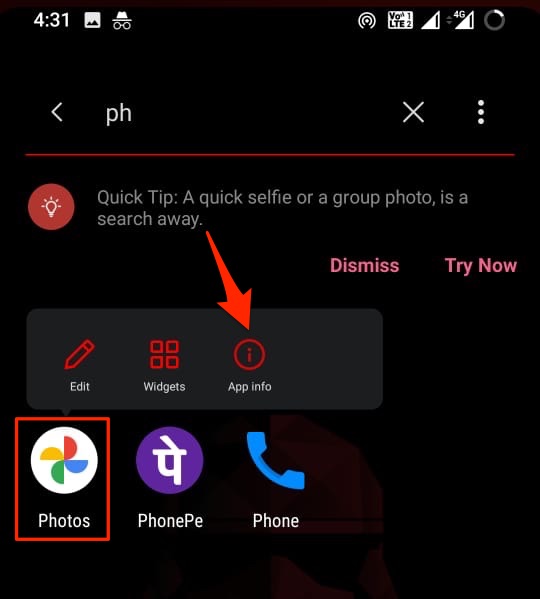
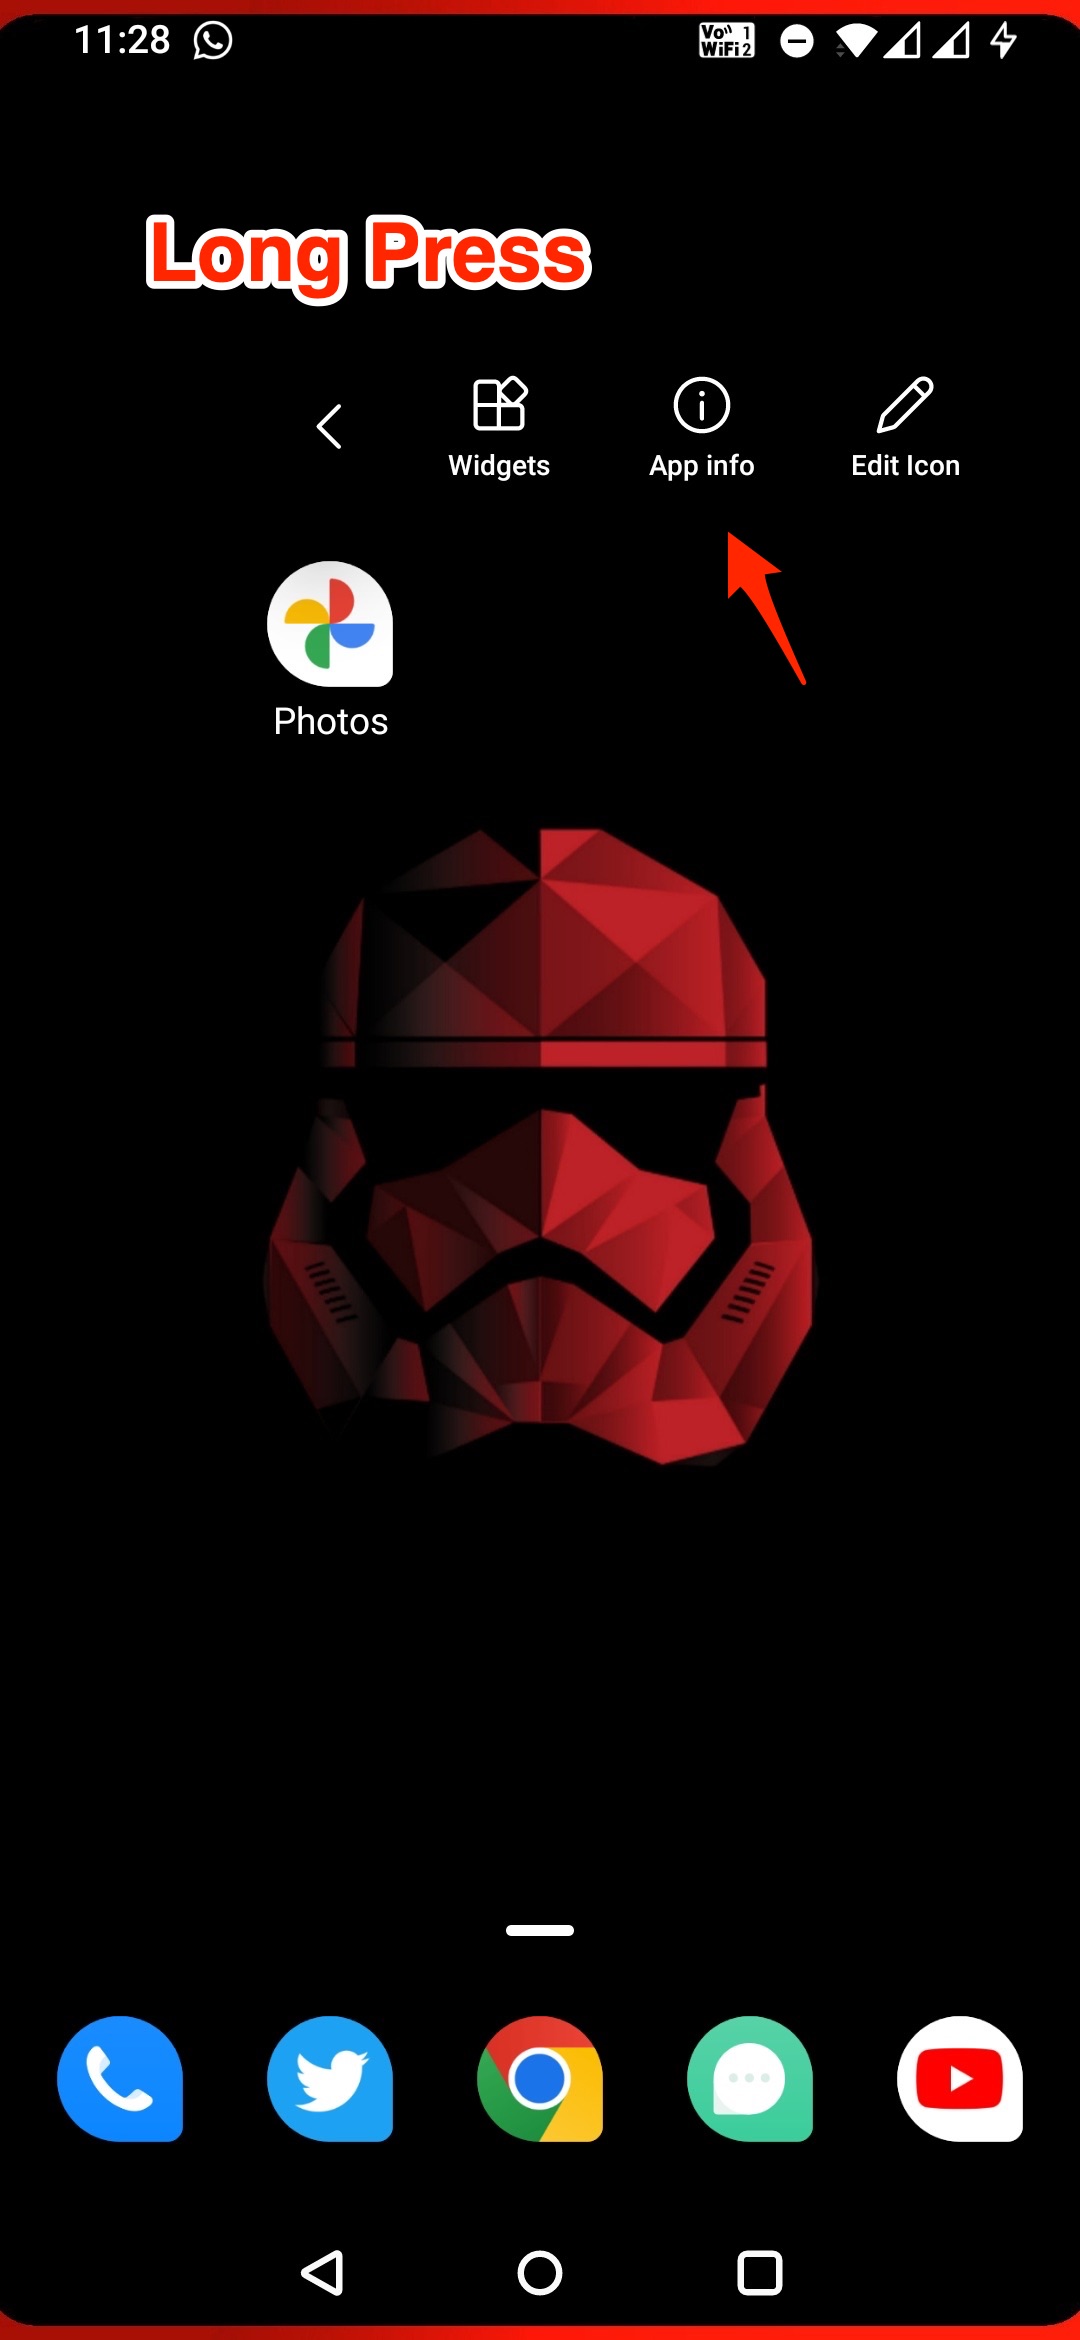
Long Press on the Photos app and then click on the App info option.
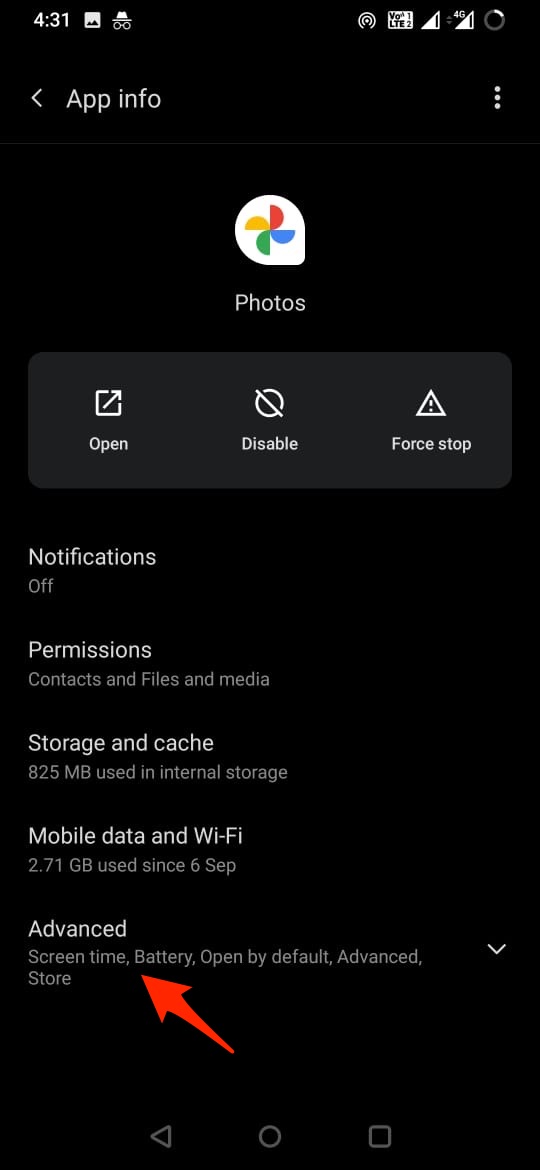
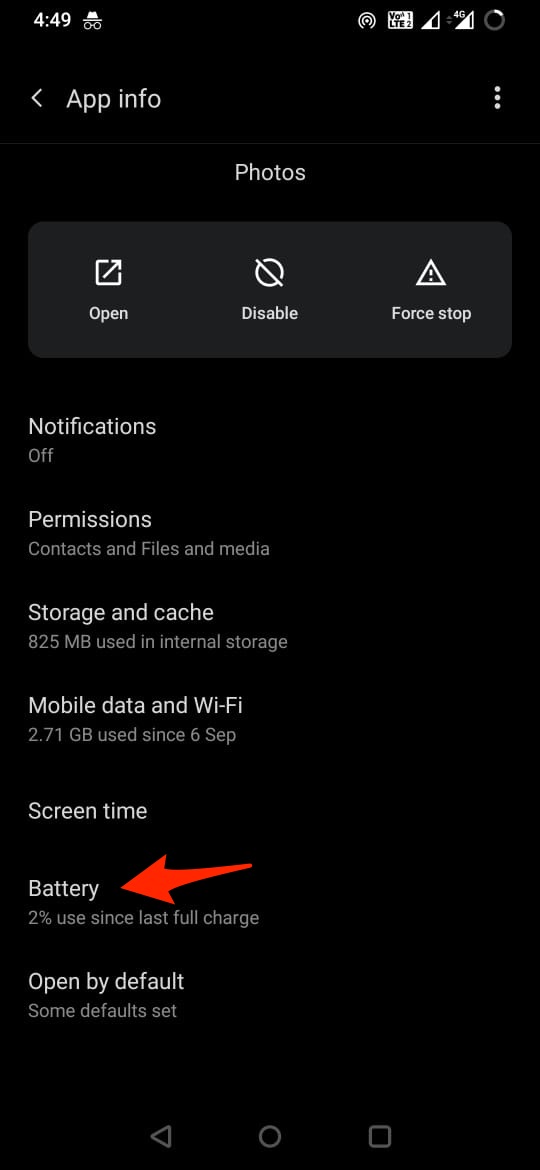
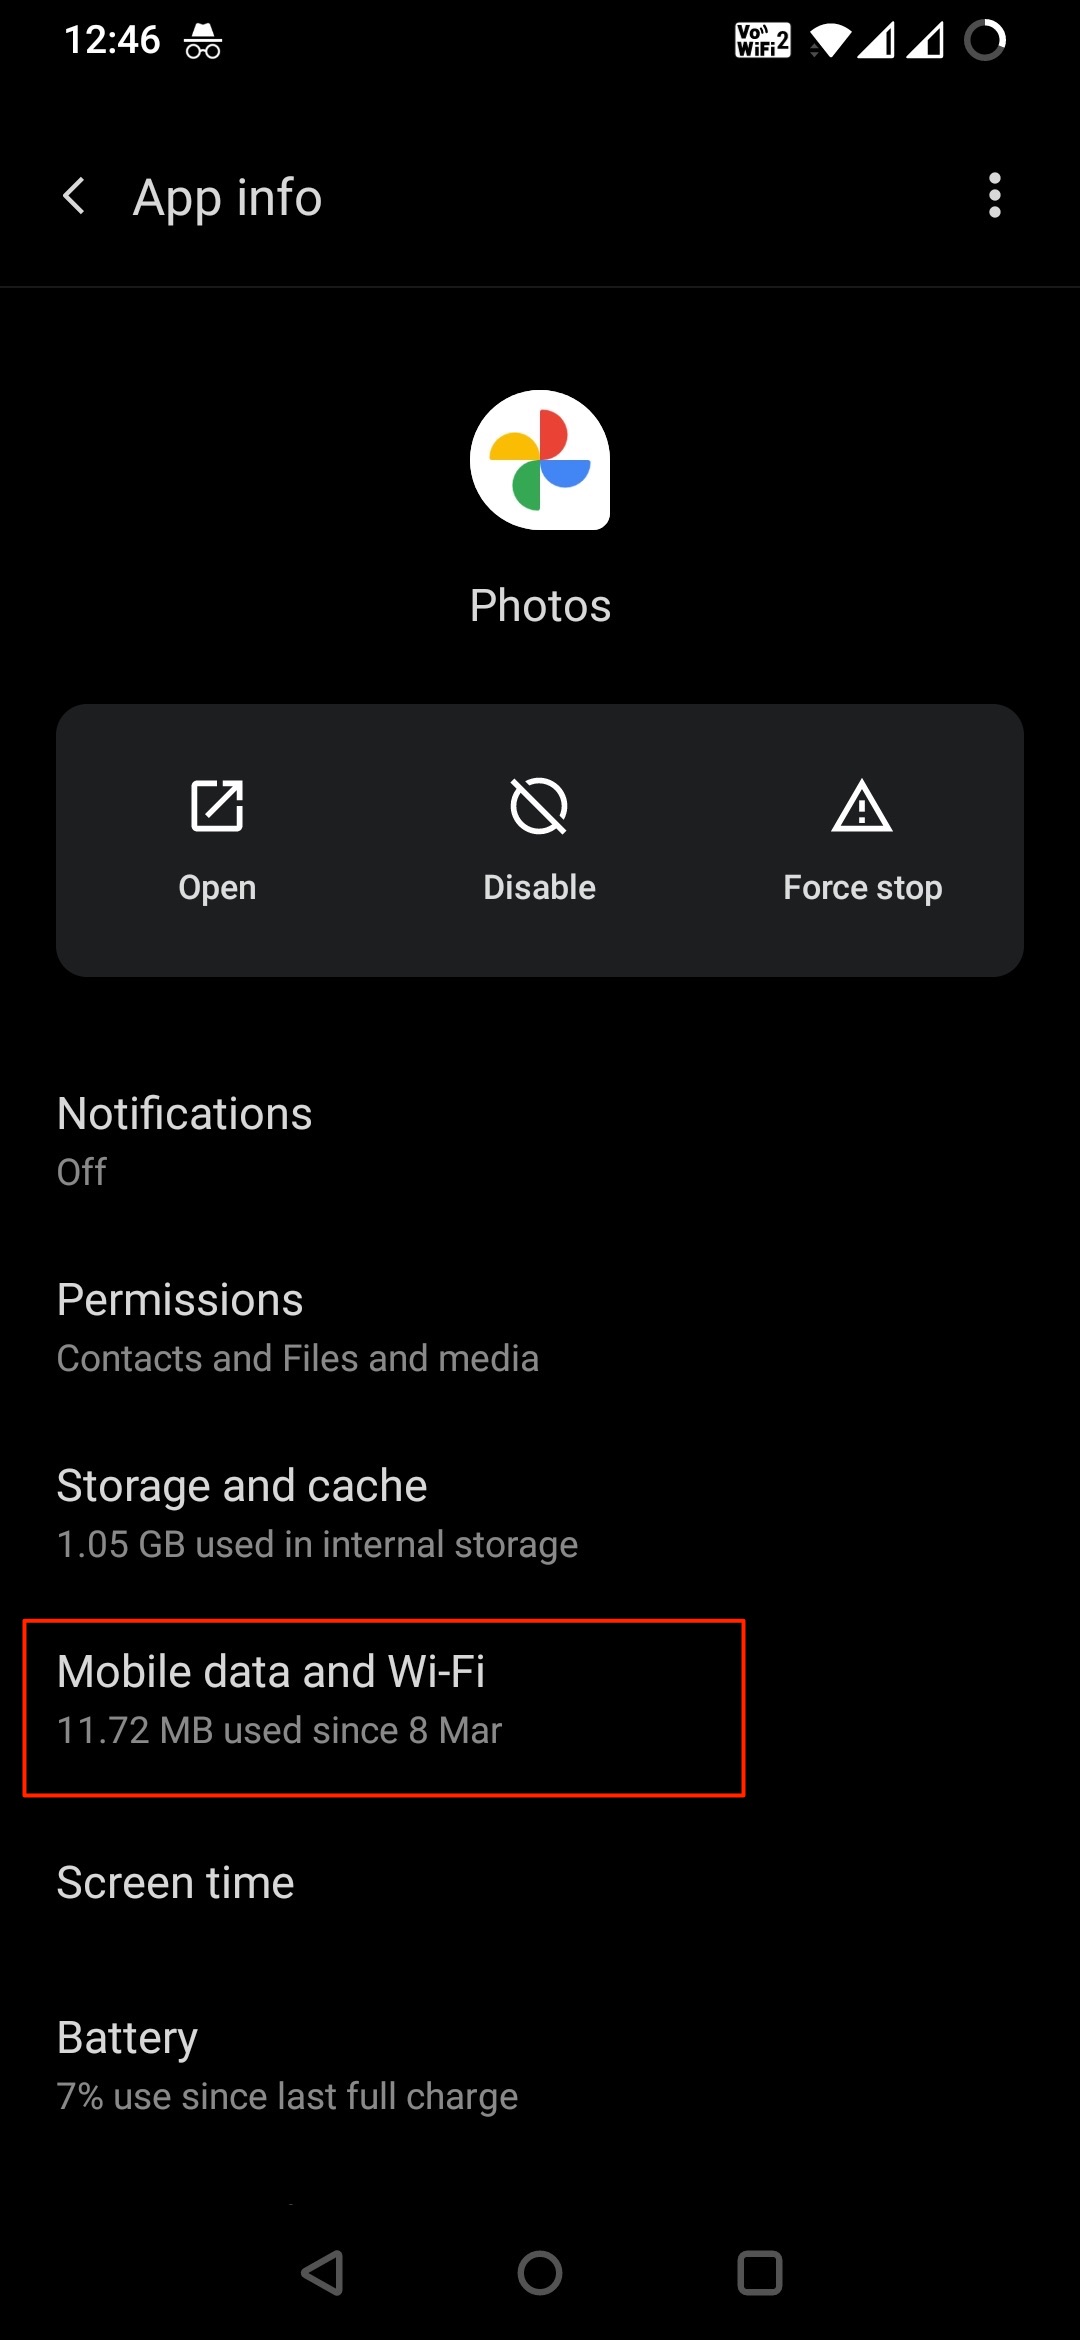
Here click on Advanced and open Battery.
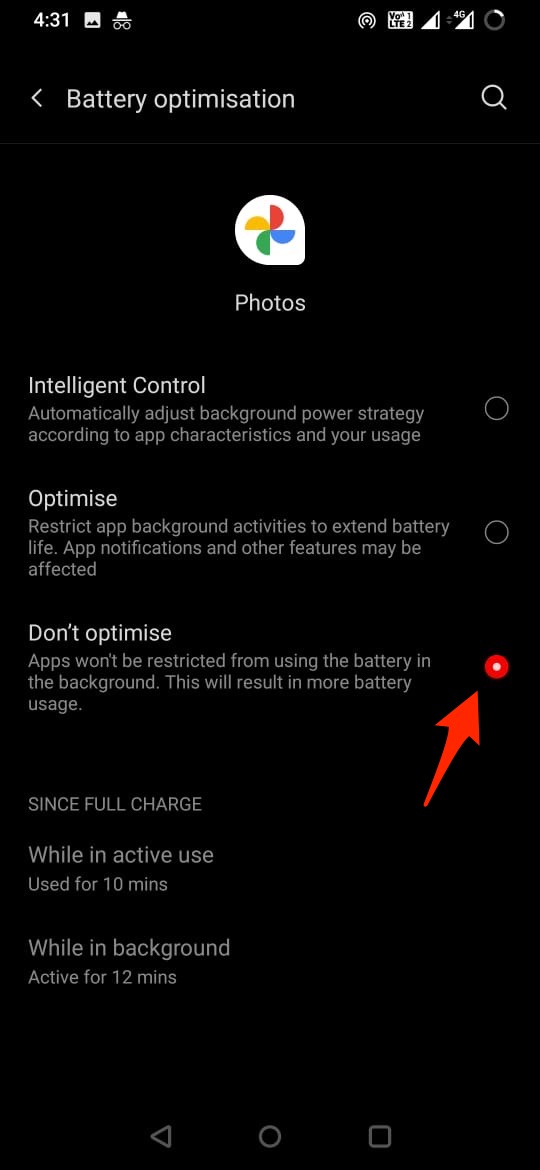
Change the settings to Don’t Optimise.
3. Enable Background Data Access
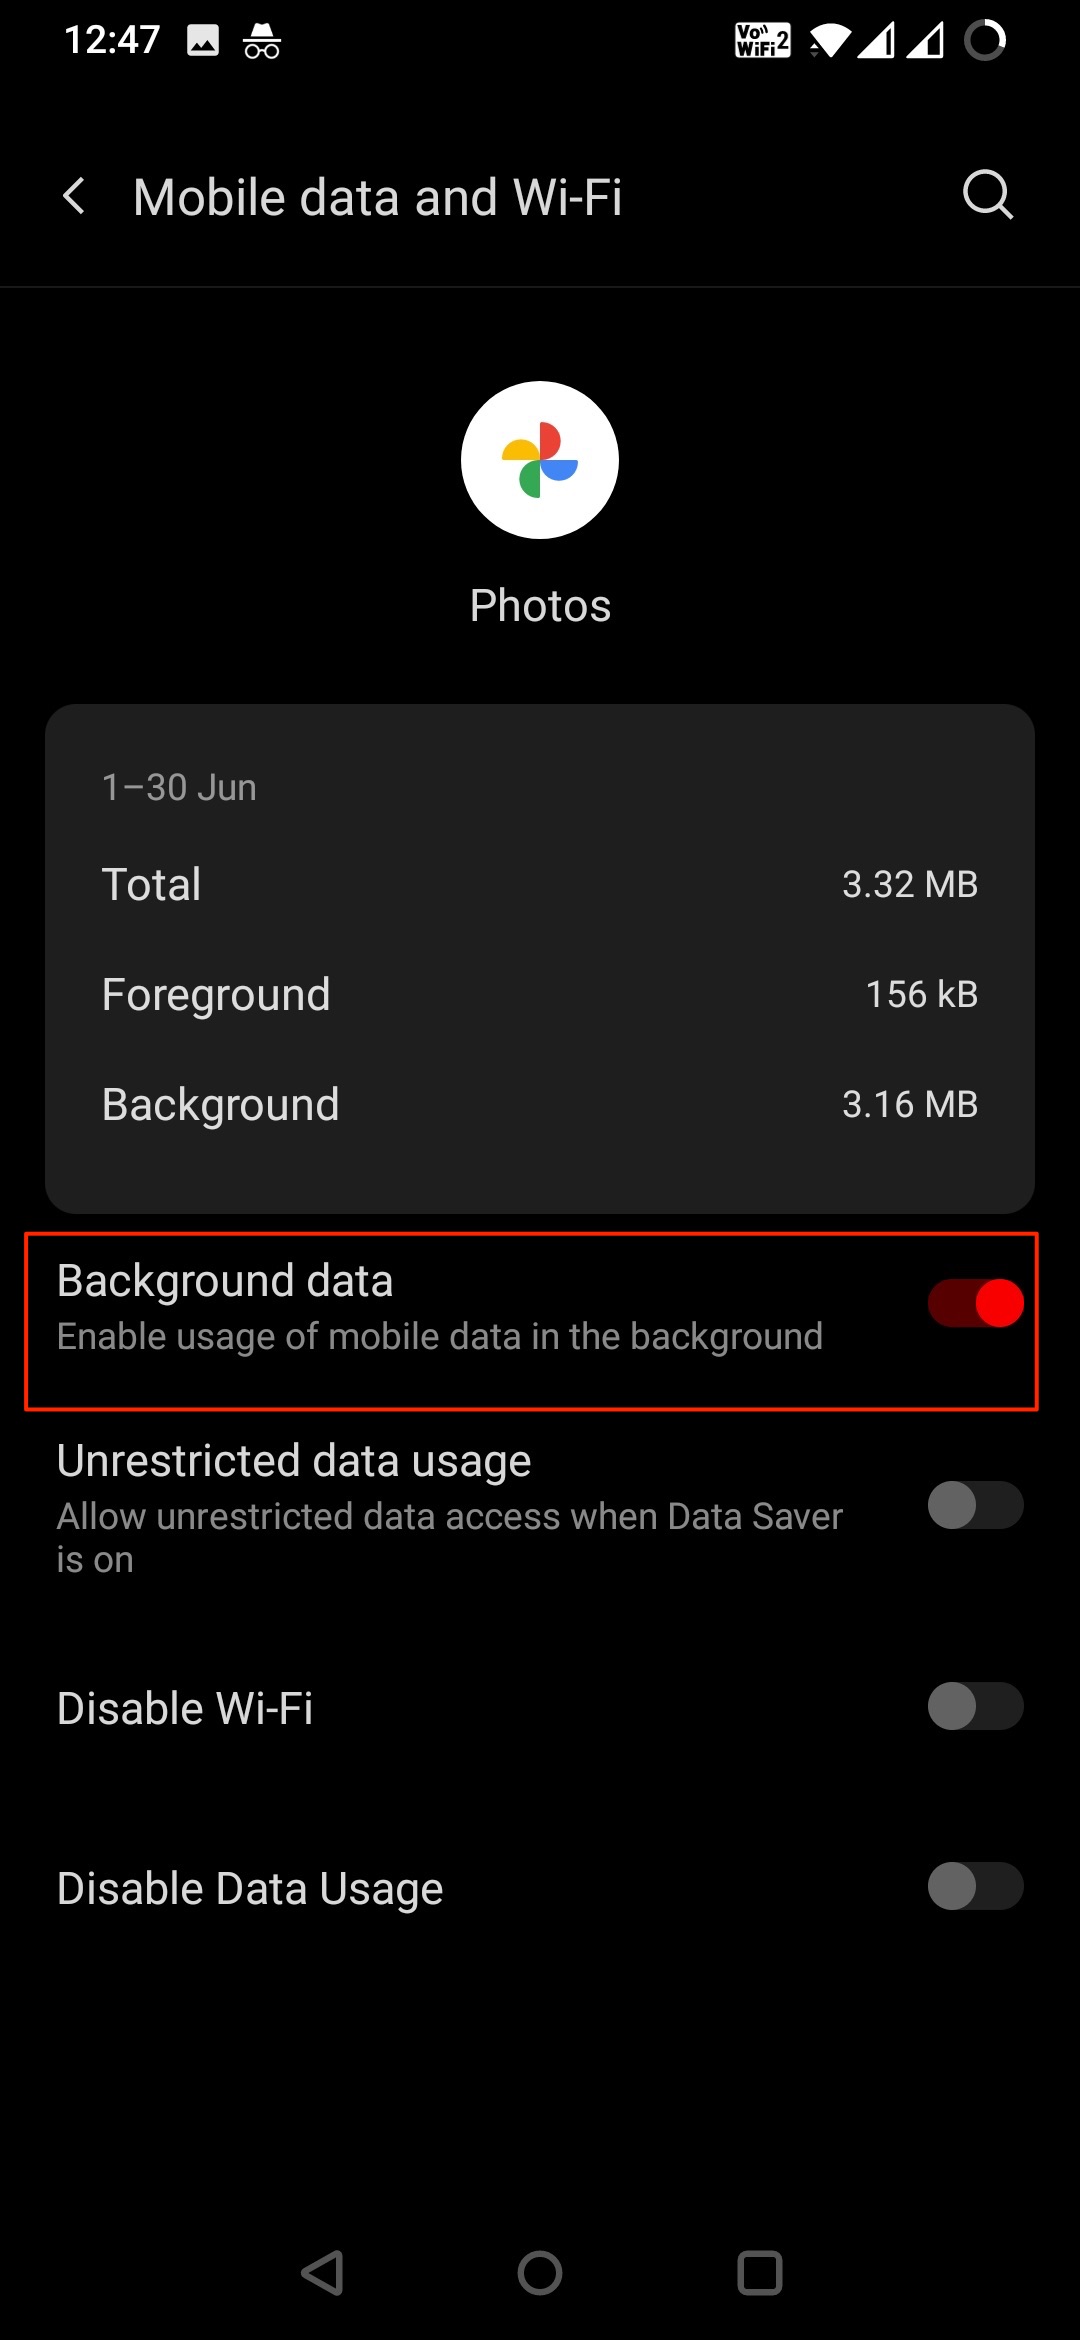
Google Photos backup in the background. Therefore, if background data is disabled or restricted then photos will not be uploaded to the Google account unless the app is running in the foreground. Enable the Background data to Google Photos auto-upload media in the background.
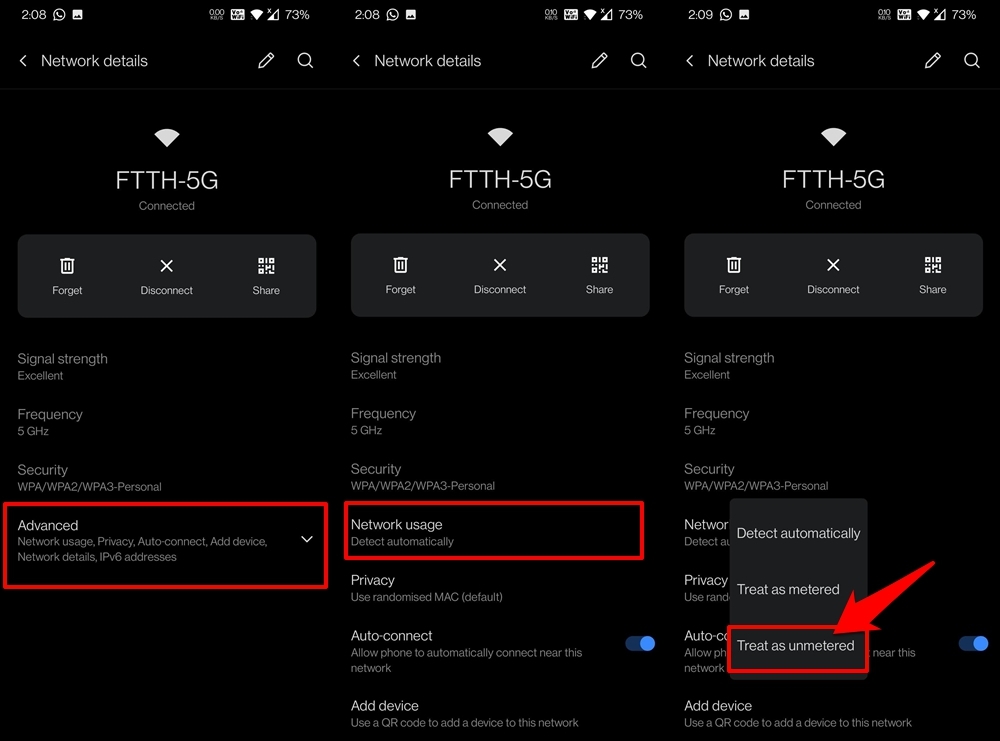
If you are connected to WiFi Network, make the network unmetered;
Open the Settings page and head over to WiFi.Tap on the network you are currently connected to and go to its Advanced section.Now tap on Network Usage and select Treat as unmetered. Give the phone unlimited access to WiFi.
4. Disable VPN or AdBlocker Apps
Google Photos need proper uninterrupted internet access to backup the photos and videos in the background. If you are using a VPN proxy or any adblocker app, they may restrict data usage as these apps create a tunnel retrieving the data from a third-party server. Therefore, the VPN and Blocker (DNS66, Blokada, etc.) apps will prevent the backup process; it is recommended to disable these apps when media are being added to the Google cloud.
5. Clear Cache of Google Photos App
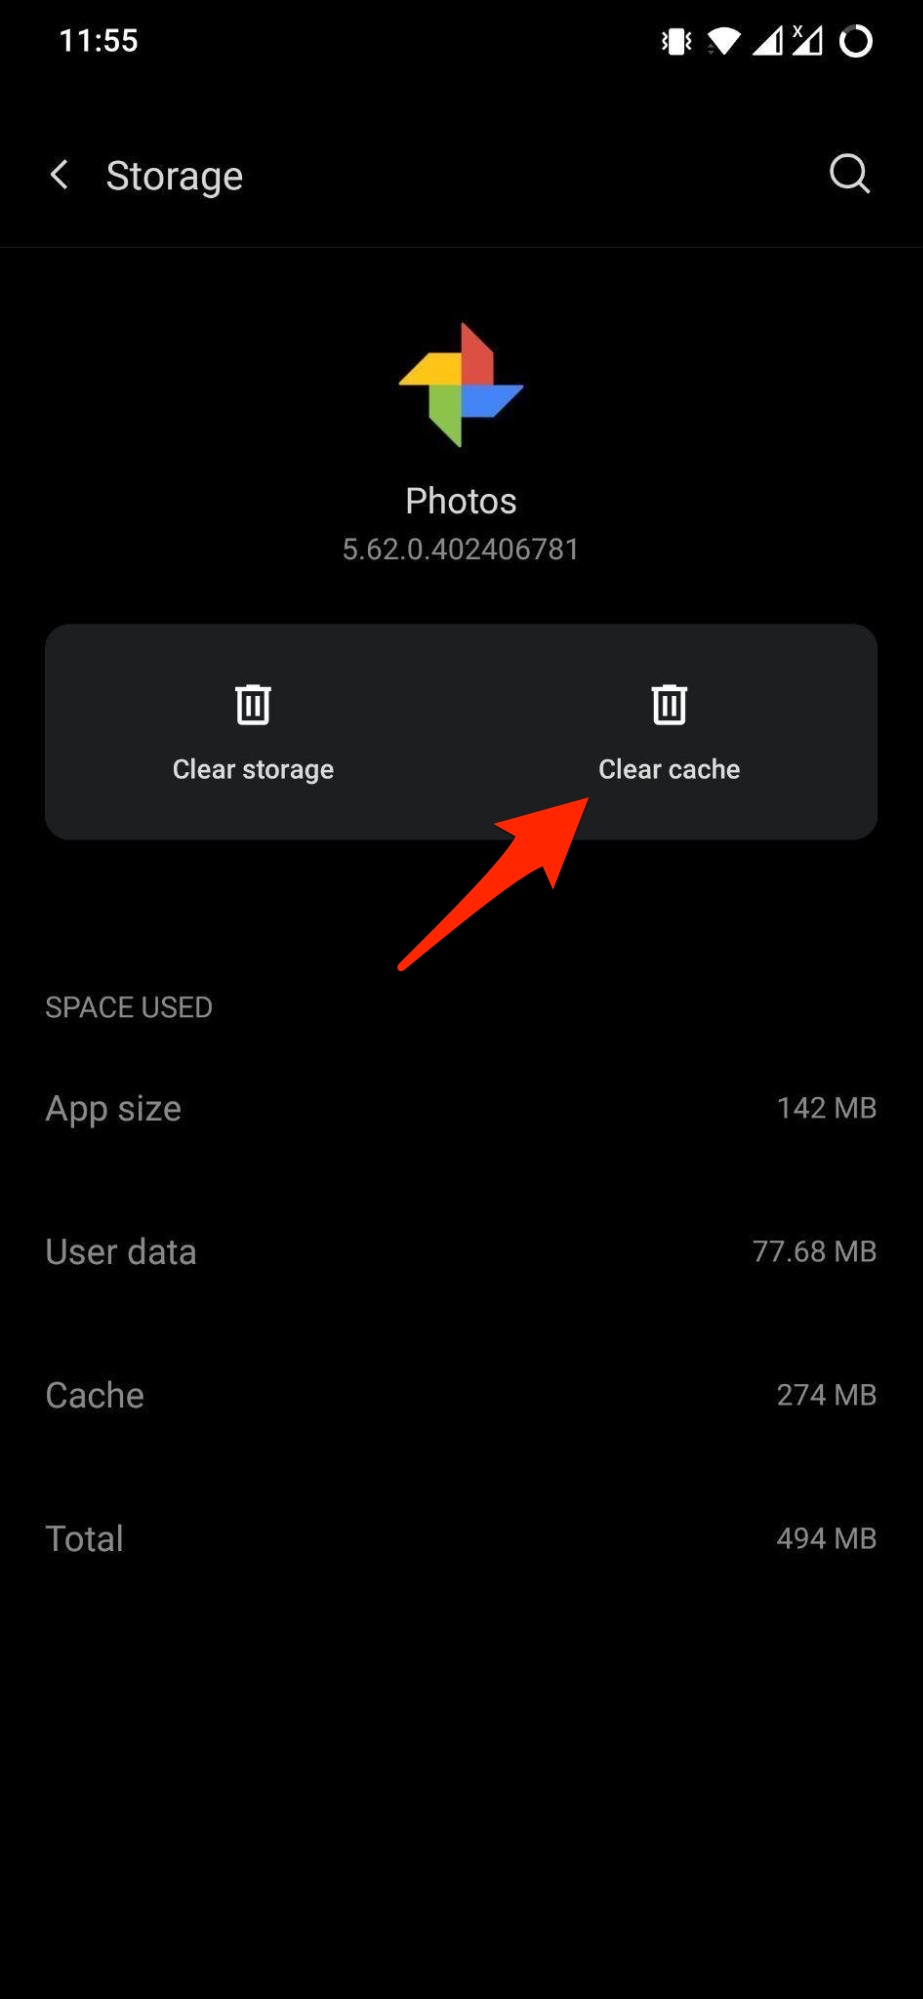
Clearing the cache of the Google photos app can fix most of the issues with the app as it will clear any filled-up junk files and other unneeded data from the app; once the cache is cleared, restart the phone and enable the backup settings.
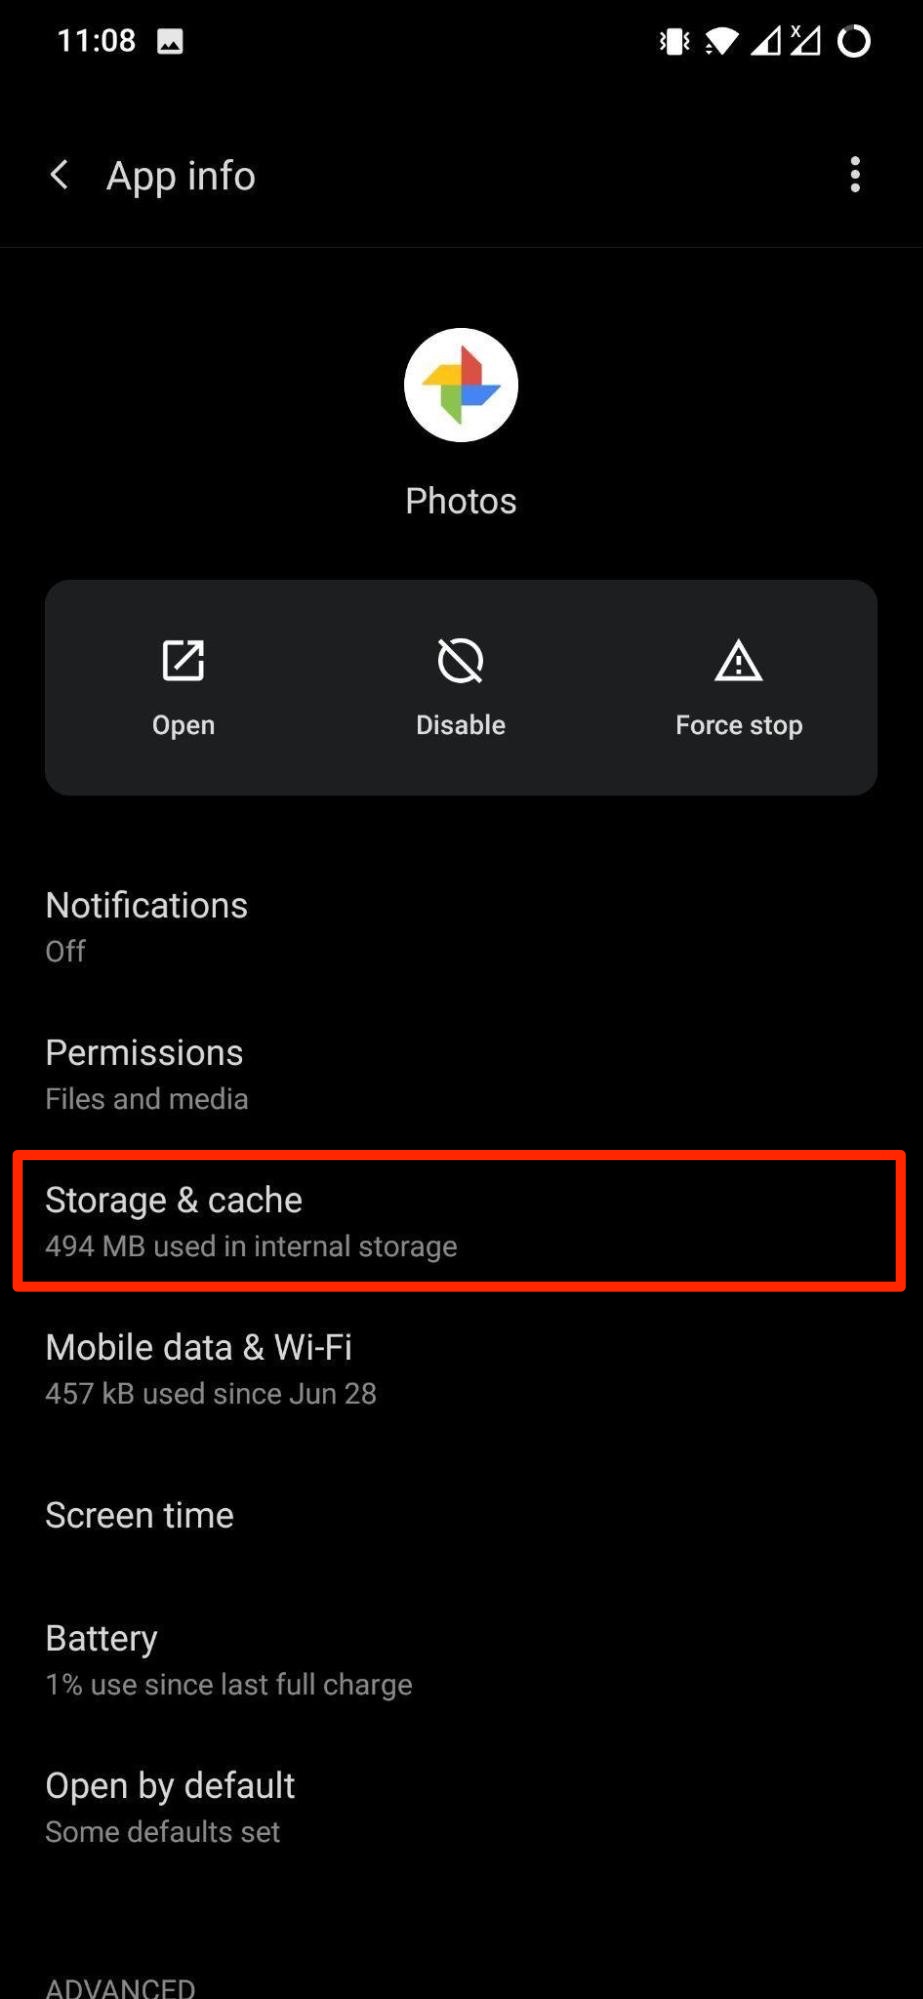
Long press on the Google Photos app icon.Tap on App info.Then tap on Storage & cache.Hit the Clear cache button.
6. Check File Format And Size
If the file format is not correct or if the size of the file is too big, then the Google Photos app may run into trouble. As mentioned on the official Google Support page, a photo or video may not get uploaded if a photo exceeds 75 MB or 100 megapixels or a video is over 10GB in size. Moreover, Google Photos supports only mpg, .mod, .mmv, .tod, .wmv, .asf, .avi, .divx, .mov, .m4v, .3gp, .3g2, .mp4, . m2t, .m2ts, .mts and .mkv file formats. So, you need to ensure that you are following the above-mentioned criteria and the file format of your media files.
7. Update The Google Photos App
One of the most common things that people miss out on is updating the apps installed on their devices. Apps are not perfect, and you will encounter a bug every now and then. App developers continuously take note of the feedback they receive from their users and include bug fixes with new updates. The same is the case with the Google Photos app. If you are running an old version of the app, then you may come across several issues with the app. It is advised that you keep the app up to date.
Conclusion
That’s it; with this simple guide, you can fix any upload issues on your Google Photos app and make sure the photos and videos from your Android mobile backing up to google without any interruption.
![]()
